Thursday, October 30, 2008

Ubuntu 8.10 Intrepid Ibex is Released

Details and press release:

Ubuntu® 8.10 Desktop Edition enables mobile, flexible computing for a changing digital world
London, October 27, 2008: Canonical Ltd. announced the upcoming availability of Ubuntu® 8.10 Desktop Edition for free download on 30 October. In related news, Canonical also announced the simultaneous release of Ubuntu 8.10 Server Edition.

Ubuntu 8.10 Desktop Edition is designed for the pervasively connected digital lifestyle. With new 3G network support, users can move smoothly from wired and WiFi networks onto 3G cellphone networks while traveling. Ubuntu 8.10 is also built to be shared - users can start a quick "guest session" on the fly and let someone use their computer to surf the web or check email, while maintaining the security and integrity of their own data. And if that person really enjoys their brief session as an Ubuntu guest, they can put Ubuntu on any USB key and take it home to install on their own computer rather than having to burn a CD.

As a bonus, all Ubuntu 8.10 users will be able to enjoy programming from the BBC, with high quality streamed content available through the default media players in Ubuntu 8.10. Canonical has worked with the BBC to make sure that much of the material is available to users in all locations.

"Ubuntu 8.10 sees us lay the groundwork for a radically different, more mobile, desktop computing environment over the next two years," says Jane Silber, COO of Canonical and head of Online Services for Canonical. "Our rapid release cycle means we can deliver the elements to support this future faster, more fully realised, and more attractively packaged than the traditional OS vendors. Ubuntu 8.10 has many features that sign-post how Linux will provide the drive and innovation in desktop computing."

"Working with open source technologies like GNOME, Ubuntu 8.10 provides exciting new features for users like creating an always-on system that seamlessly connects wireless and cellular networks," said Stormy Peters, executive director at the GNOME Foundation. "Users no longer need to worry about finding a network - their computer is always connected. This is a great step for both mobile and desktop computing."

Features
3G Support
For constant connectivity public WiFi has limitations. Improvements to the network manager in Ubuntu 8.10 makes it simple to detect and connect to 3G networks and manage connectivity. This connectivity is delivered through an inbuilt 3G modem, through 'dongle' support, through a mobile phone or through Bluetooth. It is a complex environment that Ubuntu 8.10 simplifies through a single interface and the auto-detection of many of the most popular devices.

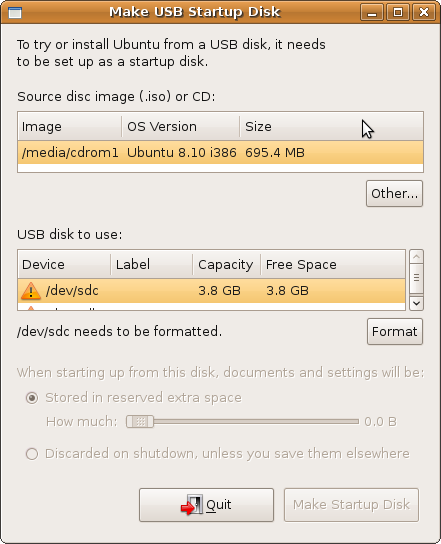
Write Ubuntu to and Install from a USB Drive
Ubuntu has been made available to users as an image for CDs and DVDs to date. But CDs and DVDs are slower, less portable and less convenient than USB sticks. Now, a simple application in Ubuntu will allow users to write Ubuntu to a USB drive, even a modified version of Ubuntu with their data on it, so it can be carried everywhere to plug in and use on any machine.

Guest Sessions
In a world of 'always on' pervasive computing it is more likely that users lend their computers to colleagues or friends at conferences, cafes or at parties so they can check email, etc. Guest sessions allow users to lock down a session easily so a guest can use the full system without interference with programs or data.

BBC Content
Starting the media players within Ubuntu (Totem Movie Player and Rhythmbox) launches a menu of selected content from the broadcaster that is free to air. This is a mixture of video, radio and podcasts and available in high quality, much of it playable using non-proprietary codecs. Content is constantly updated via the corporation's stream and will vary dependent on location, though some content will be available for every user.

Latest Gnome 2.24 Desktop Environment
The GNOME desktop environment project releases its latest version which is incorporated into Ubuntu 8.10. New features include a new instant messaging client, a built-in time tracker, improved file management and toolbars plus better support for multiple monitor use with the ability to set screen resolution by monitor.

Pricing, Availability and Technical Information
* Additional information and a feature tour is available at www.ubuntu.com.
* Ubuntu 8.10 Desktop Edition is free of charge and available on Thursday 30 October from http://www.ubuntu.com/download.
* The Server press release can be found at http://www.ubuntu.com/news/ubuntu-8.10-server.

About Canonical Ltd
Canonical Ltd, the commercial sponsor of Ubuntu, is a global organisation headquartered in Europe committed to the development, distribution and support of open source software products and communities. World-class 24x7 commercial support for Ubuntu is available through Canonical's global support team and partners. Since its launch in October 2004 Ubuntu has become one of the most highly regarded Linux distributions with millions of users around the world.

Ubuntu will always be free to download, free to use and free to distribute to others. With these goals in mind, Ubuntu aims to be the most widely used Linux system, and is the centre of a global open source software ecosystem. For more information visit www.canonical.com or www.ubuntu.com.

Have a question or problem that this article doesn't cover?
Ask our Ubuntu Mini 9 Google Group for help.

Tuesday, October 28, 2008

Get CodeWeaver Products Free for a Day

CodeWeavers is a software company that sells a proprietary version of Wine called CrossOver, for running Windows applications on Mac OS X and Linux. The company's products focus on making Microsoft software staples like Microsoft Office, MS Word, and MS Excel and various games (Team Fortess 2, CounterStrike, World of Warcraft, and Guild Wars) run in Linux.

In July, CodeWeavers came up with the gimmick to make its products available free for a day if any one of five positive things happened during Bush's last six months in office: gas drops to $2.79 a gallon, milk drops to $3.50 a gallon, U.S. jobs exceed 138 million, the Twin Cities median home price returns to $233,000 or Osama bin Laden is captured.

Gas dropped to $2.79 a gallon, so today (October 28th 2008), all of CodeWeavers products, can be downloaded for free at the company's website, www.codeweavers.com. Hurry up and pick up your copy of CrossOver Pro Linux, CrossOver Pro Mac, CrossOver Games for Linux, or CrossOver Games for Mac.

<
Have a question or problem that this article doesn't cover?
Ask our Ubuntu Mini 9 Google Group for help.

Sunday, October 26, 2008

Installing Wine in Ubuntu 8.10 Intrepid Ibex

Wine is a compatibility layer for running Windows applications on Linux.
Applications are run at full speed without the need of cpu emulation.

There are two ways to install Wine in Ubuntu; from the Ubuntu repository and from Wine official repository. Both have advantages and disadvantages but both offer an amazing compatibility layer for running Windows applications in Linux.

Get the Stable Version

Version 1.0.1 is available in the Ubuntu repositories. Canonical does not provide updates for wine, but this version is better tested. It is not prone to regressions and broken functionality.

To Install Wine
In a terminal type:
sudo apt-get install wine


Get the Newest Version
These packages are development packages, they will periodically suffer from regressions, and may break functionality in Wine. If the stable release in the Ubuntu repositories of Wine works for you, then you may not want to use the development packages.

Add repository key
In a terminal type:
wget -q http://wine.budgetdedicated.com/apt/387EE263.gpg -O- | sudo apt-key add -

Add Wine repository
In a terminal type:
sudo wget http://wine.budgetdedicated.com/apt/sources.list.d/intrepid.list -O /etc/apt/sources.list.d/winehq.list

Update your system
In a terminal type:
sudo apt-get update

To install Wine
In a terminal type:
sudo apt-get install wine


After Install
Once installed (either method) you can configure Wine by running:
winecfg
(either in a terminal or in the Run Application box)

Make Wine Graphical User Interface Match Ubuntu's
Ina terminal type:
gedit ~/.wine/user.reg

Replace the [Control Panel\\Colors] section with:

[Control Panel\\Colors] 1176981676
"ActiveBorder"="239 235 231"
"ActiveTitle"="203 133 61"
"AppWorkSpace"="198 198 191"
"Background"="93 77 52"
"ButtonAlternativeFace"="200 0 0"
"ButtonDkShadow"="85 85 82"
"ButtonFace"="239 235 231"
"ButtonHilight"="255 255 255"
"ButtonLight"="255 255 255"
"ButtonShadow"="198 198 191"
"ButtonText"="0 0 0"
"GradientActiveTitle"="239 235 231"
"GradientInactiveTitle"="239 235 231"
"GrayText"="198 198 191"
"Hilight"="246 200 129"
"HilightText"="0 0 0"
"InactiveBorder"="239 235 231"
"InactiveTitle"="239 235 231"
"InactiveTitleText"="255 255 255"
"InfoText"="0 0 0"
"InfoWindow"="255 255 166"
"Menu"="239 235 231"
"MenuBar"="239 235 231"
"MenuHilight"="246 200 129"
"MenuText"="0 0 0"
"Scrollbar"="239 235 231"
"TitleText"="255 255 255"
"Window"="255 255 255"
"WindowFrame"="0 0 0"
"WindowText"="0 0 0"

Before Changing Colors
Screenshot-Wine configuration


After Changing Colors
Screenshot-Wine configuration-1

Have a question or problem that this article doesn't cover?
Ask our Ubuntu Mini 9 Google Group for help.

Wednesday, October 22, 2008

Mailbag

Libercad asks:
Can you publish the result of this command?
uname -a
sure, Linux red-mini 2.6.27-7-generic #1 SMP i686 GNU/Linux

Thor2002ro asks:
Can I get your contact info?
If you want to reach me you can find me on gmail, aim, skype and last.fm under the name redDEADresolve. I don't mind helping you out, just remember I am not Dell Ubuntu tech support.

Ron Z asked:
Does Ubuntu on the Dell Mini have dual monitor support or does it only provide mirroring?
I am only able to get mirror mode working, maybe some readers have been able to get dual monitor support working. Leave a comment and help Ron Z out.

Mattias asked:
Did you try different Secure digital High Capacity cards?
I only tried the one I bought, the Transend 8GB SDHC S5 Model TS8GSDHC6- S5W. Leave a comment about your models for Mattias.

phreaksYcle asked Neil J Patel (one of the Ubuntu Netbook Remix developers):
Do I need to install ume-config-netbook?
Neil wrote back: Nope, this package shouldn't be needed at all. All the work for the
diamondville based systems is already in hardy/intrepid, so things should just work. The only thing that would ever need configuration (and only sometimes) seems to be things like
wifi/audio/suspend-resume, but ume-config didn't handle these things anyway.

And finally nanog brought some interesting info to my attention.
Could you please correct your statement on this blog and on the mini forum thread. The fluendo multimedia codecs provided by Dell are definitely not available at medibuntu. These proprietary codecs are available for purchase from canonical here.

nanog is right my guide and medibuntu do not contain the same codecs as the Fluendo multimedia codecs. But in the last two years of using Ubuntu and these guides, I have never some across a media format that I wasn't able to play. Plus, nanog has been kind of mean to pHreak on the Ubuntu Forums. Be cool, he's a 15 year old kid trying to get the hang of Ubuntu. It's my job to yell at him if he's wrong, not yours =)

Have a question or problem that this article doesn't cover?
Ask our Ubuntu Mini 9 Google Group for help.

Secure Digital High Capacity, SD 2.0 Works

The Dell Mini 9 is able to read and write to Secure Digital High Capacity cards in Ubuntu 8.10 Intrepid Ibex.

Also tried:
Memory Stick
Standard Secure Digital
MultiMediaCard (MMC)

Looks like the reader is 100% Linux compatible.

Have a question or problem that this article doesn't cover?
Ask our Ubuntu Mini 9 Google Group for help.

Sunday, October 19, 2008

ACPI: GC: GPE storm detected

SOLVED
It was an error in the usb-creator software. I used UNetnootin and installation worked flawlessly.

-----------
I was trying to reinstall Ubuntu 8.10 Beta on my Dell Mini 9. Instead of going to a LiveUSB desktop it keeps throwing me into a BusyBox Shell. I get the error:
[ 0.749487] ACPI: GC: GPE storm detected, disabling EC GPE
Loading Please wait...
BusyBox v1.10.2 (Ubuntu 1:1.10.2-1ubuntu4) built in shell (ash)
Enter 'help' for a list of built-commands.

I tried adding acpi=off in the boot parameters but no luck.

Have a question or problem that this article doesn't cover?
Ask our Ubuntu Mini 9 Google Group for help.

Friday, October 17, 2008

Ubuntu 8.10 Intrepid Ibex on the Dell Mini 9

Installation
An installation guide can be found here and help creating a LiveUSB drive here.
Intrepid installs without sound working. It's a simple fix that involves adding a line to your alsa base-file. Instructions can be found at the end of the end of the installation guide. All other hardware installs without any problems.

A lot of readers have had problems installing Ubuntu on their netbooks because of incompatible USB flash drives. Please consult our USB Flash Drive Compatibility List if you are having problems installing Ubuntu. Many installation problems are due to incompatible flash drives.

Wireless
Works out of the box. I decided to enable the proprietary Broadcom STA wireless driver from Hardware Drivers manager (found under System>Administration>Hardware Drivers) and was connecting to various wireless points without any trouble.
*New users are having trouble with enabling wifi. Make sure your wifi is turned on. Turn it on in Windows or in the BIOS.

Netbook Remix
Installs without a problem. Instructions on how to install and configure it can be found here.

Compiz-Fusion
The Intel Graphics Media Accelerator (GMA) 950 supports 3D out of the box and Compiz works much better than I expected. I hate that Compiz tries to loads on startup even when using the netbook-laucher. It's an easy fix. You do not want Compiz loading when trying to use Netbook Remix.

To get the most out of Compiz install the advanced configuration tool.
In a terminal:
sudo apt-get install compizconfig-settings-manager

Media Codecs
Ubuntu will install the proper codec when you try to open an unsupported file. Most codecs can be installed this way. I prefer to install them all at once. A guide for the all major codecs can be found here and encrypted DVD playback and w32codecs here.

Ethernet
No problems with connecting to the web or my router.

Brightness & Volume
Brightness and volume keyboard shortcuts both work with any extra configuration.

Suspend & Hibernate
Suspend works incredibly well. I suspended my computer over and over without a problem.
Hibernate will not work if you do not have a swap partition.

Video Out
Works out of the box, you won't have to edit your xorg.conf file.
Video out while loading Grub has a tendency to jitter, but once the Ubuntu splash screen comes up video corrects itself.

Bluetooth
My mouse and headset connected without a problem.

Web Camera
Works out of the box with no setup. To test it I installed Chesse, the Gnome webcam application. When you first run Cheese it might be slow or choppy, turn the resolution down (found under Edit>Preferences).

To install cheese
In a terminal type:
sudo apt-get install cheese

Card Reader
Works out of the box. Secure Digital High Capacity, SD 2.0 also works.

Sound
Ubuntu 8.10 installs without sound working. Instructions can be found at the end of the end of the installation guide to enable sound.

Battery
I'm getting around fours hours a charge. I'm surfing the net, watching videos, using Bluetooth and keeping my screen relatively bright.

Overall:
Installation could not be easier. Once the sound issue was fixed everything simply worked.
Screenshot

Have a question or problem that this article doesn't cover?
Ask our Ubuntu Mini 9 Google Group for help.

User Guides for Ubuntu 8.10 Intrepid Ibex

If you have decided to upgrade or run Ubuntu 8.10 on your Dell Inspiron Mini 9 you came to the right place. Every piece of hardware on the Dell Mini 9 works in Ubuntu, some things require a bit of work but it's not as hard as it looks.

An overview of Ubuntu 8.10 on the Dell Mini 9

Creating a LiveUSB Stick

Installing Ubuntu 8.10 on the Dell Mini

Installing Ubuntu Netbook Remix

Fixing the USB mounting problem after install

Enabling sound on the Dell Mini 9, walkthrough is at the end of the install guide

Installing Aircraft Manager to Turn Bluetooth and WiFi on/off

Stop Compiz-Fusion From Loading Automatically, necessary for running Ubuntu Netbook Remix

Disable Tracker stop unnecessary wear and tear on your SSD

Customizing Firefox for Netbooks, amazing article for speeding up Firefox and making the most of the small screen resolution

Installing media codecs, for playing mp3, DVD, avi, mp4, aac, etc

Installing Medibuntu for encrypted DVD playback, Windows codecs and Microsoft fonts

Installing and Configuring Skype on the Dell Mini 9

Installing Wine

Have a question or problem that this article doesn't cover?
Ask our Ubuntu Mini 9 Google Group for help.

Medibuntu for Ubuntu 8.10

Medibuntu (Multimedia, Entertainment & Distractions In Ubuntu) is a repository of packages that cannot be included into the Ubuntu distribution for legal reasons like copyright, license or patent restrictions. It also includes many popular .debs for ffmpeg encoding, w32codes, skype and google earth.

Ubuntu 8.10 Intrepid Ibex can not play encrypted DVDs or use certain Windows codecs out of the box. This guide will show you how to install the Medibuntu repository and these codecs.

Add the Medibuntu Repository
In a terminal type:
sudo wget http://www.medibuntu.org/sources.list.d/intrepid.list -O /etc/apt/sources.list.d/medibuntu.list

Then you have to add the GPG Key to authenticate the packages and Update
In a terminal type:
sudo apt-get update && sudo apt-get install medibuntu-keyring && sudo apt-get update

You may be asked to accept this package even though it cannot be authenticated. This is normal; typing "Yes" means you trust Medibuntu.

Download the encrypted DVD playback codecs
In a terminal type:
sudo apt-get install libdvdcss2 libdvdread3

Download the Window codecs
In a terminal type:
sudo apt-get install w32codecs

Have a question or problem that this article doesn't cover?
Ask our Ubuntu Mini 9 Google Group for help.

Reinstallng Media Codecs

Ubuntu strives to make all software that meets the licensing terms in the Ubuntu License Policy available. However patent and copyright restrictions complicate free operating systems distributing software to support proprietary formats.

Ubuntu's commitment to only include completely free software by default means that proprietary media formats are not configured 'out of the box'.

Configuring these formats after a fresh install is simple. This guide will allowing you to play Flash, Java mp3, aac, DVDs ,mp4, avi, wmv and many more formats. It also installs the Microsoft true type fonts for better compatibility with Word documents.

In a terminal type:
sudo apt-get install ubuntu-restricted-extras

Have a question or problem that this article doesn't cover?
Ask our Ubuntu Mini 9 Google Group for help.

Thursday, October 16, 2008

Fixing USB Mounting Problems After Install

Wolfkeeper, good looking out and thanks for the heads up!

When you use a LiveUSB drive to install Ubuntu on the Dell Mini 9, you create a problem with your fstab: any USB flash drive you insert into your mini will be seen as a CD/DVD drive.

If you get this error, "invalid mount option when attempting to mount the volume", apply this very easy fix.


In a terminal type:
sudo gedit /etc/fstab

You should get a text file similar to this:
Screenshot-fstab (-etc) - gedit
Look for a line that is similar to the highlighted section.
It has my USB drive as /media/cdrom0, making it unable to mount.

If you need to see what your USB drive is being mounted under,
In a terminal type:
sudo fdisk -l
and look through the output for your device name.

Simply delete the line.
Screenshot-fstab (-etc) - gedit-1

Now you can use USB drives normally.

Have a question or problem that this article doesn't cover?
Ask our Ubuntu Mini 9 Google Group for help.

Installing Ubuntu 8.10 on the Dell Inspiron Mini 9

Step 1. Prepare your install disc/drive
Download Ubuntu, (I used Ubuntu 8.10 Intrepid Ibex) and burn it to a disc or make a LiveUSB drive (an Ubuntu install CD placed onto a bootable USB flash drive).
Then connect your Mini 9 to an optical drive or insert a LiveUSB drive.
If you need helping making a LiveUSB stick, the guide can be found here.

Readers have had problems installing Ubuntu on their netbooks because of incompatible USB flash drives. Please consult our USB Flash Drive Compatibility List if you are having problems installing Ubuntu. Many installation problems are due to incompatible flash drives.


Step 2. Set your Mini 9 to boot from optical drive or USB


At the Dell splash screen (the Dell logo that appears when you turn your Mini on) press 2.
This will take you into the Mini's BIOS, from there go to the BOOT tab.
Use F6 and F7 (Fn H and J respectively on the mini) to move your intended boot device up and down the list.
The optical media drive or USB drive should be a the top of this list.


Step 3. Install Ubuntu
Choose the language for your installer
1-choose-language

Choose either try Ubuntu without making any changes to your computer or install Ubuntu.
Either option will allow you to install Ubuntu, feel free to try it out before you commit
2-choose-install

Allow Ubuntu to load, this may take some time.
3-kernel-loading

I choose to try Ubuntu first, after you have made up your mind click the install icon to begin
4-ubuntu-desktop

At the Welcome screen select your language
5-welcome

Select your country and time zone
6-where-are-you

Select your keyboard layout
7-keyboard-layout

Now the installer will ask you how you want to partition the disk.
The Guided option will do all the work for you but also install a swap partition. We do not want a swap partition. It will constantly write to your solid state drive, wearing down it's life span.
Select manual. This guide will walk you through two different options for a manual install.
10-manual-install

Delete Dell's installed partitions, no love lost there.
11-prepare-partitions

Now you should see your whole hard drive as free space. Select the new partition option.
12-vanillia-paritions

Method 1: Install your operating system and home folder as two separate partitions.
This is my preferred method, it allows you keep your data and your operating system separate. When you want to upgrade your Ubuntu install, you don't have to worry about losing or backing up your person data (it's separate). When your operating system gets corrupted you don't lose you data.

Now you have to decide on how much space you want to dedicate to your operating system. I chose to use 4GB (1024x4=4096), you need at least 2GB. Make it primary, have it start from the begining, I choose the ext2 file system because it writes less to the disk (you can choose which every you prefer), and it's mount point should be /.
13-filesystem-setup

Next, format the remaining space for your home partition (where your personal files and data are stored).
14-partition-free-space

Select Primary, dedicate all the remaining space to the partition, location should be Beginning, File System is your preference and the mount point should be /home.
15-home-setup

It's normal to end up with some remaining free space. The remaining shouldn't be very large. I ended up with 98MB every time no matter what method I used.
15-proper-partitions-mult

Method 2: Install your operating system and home folder as one partition.
This is not an incorrect way to partition your drive, it's just not my preferred method.
16-one-partition-setup

Make this partition Primary and as large as possible. it's location should be beginning, I choose the ext2 file system because it writes less to the disk (you can choose whichever you prefer), and it's mount point should be /.
17-single-proper-setup

It's normal to end up with some remaining free space. The remaining shouldn't be very large. I ended up with 98MB every time no matter what method I use.

After continuing forward you will receive this message:
18-swap-warning
Continue, we don't want swap space.

Setup your user account
19-user-setup

Check to make sure you did Method 1 correctly.
It should look similar to this, two partitions, no swap.
20-install-check-mult

Check to make sure you did Method 2 correctly.
It should look similar to this, one partition, no swap.
21-install-check-single

Ubuntu will begin to install your operating system
22-installing-system

Restart
23-install-finished-restart


Step 4. Get sound working
In a terminal type:
sudo gedit /etc/modprobe.d/alsa-base

At the end of alsa-base file add:
options snd-hda-intel model=dell
add_text
*Then save this file.

Reboot your Mini
In a terminal type:
sudo reboot

After logging in, double click the volume icon and turn your speaker volume up.
turn_spesker


Optional: Fix your fstab
If you used the LiveUSB install method, you need to fix your fstab file. The guide can be found here.


Optional: Install Ubuntu Netbook Remix
Follow this guide. Remember to install the correct version for your distro.

Enjoy!

Have a question or problem that this article doesn't cover?
Ask our Ubuntu Mini 9 Google Group for help.

Mini 9 Ships with Partition Error

Dell really dropped the ball with the Mini 9. The Ubuntu version is just severely crippled. The Dell Custom User Interface isn't anywhere as fast, advanced or intuitive as Netbook Remix's ume-launcher and it ships with a poorly partitioned hard drive.

I bought the 16BG hard drive with my Mini 9, as you can see from the picture below. What I received from Dell was a 4GB install of Mini OS. Thanks Dell, I don't need the 8GB of extra hard drive space I specifically paid for.

Screenshot_fdisk

I quickly ditched Mini OS and installed Ubuntu 8.10 Beta. Look at the difference:

new_partitions

To check your hard drive partitions
In a terminal type:
sudo fdisk -l

And, don't worry UbuntuMini.com has your back. You can learn how to make a LiveUSB and then install Ubuntu properly onto your Mini 9. - Install guide HERE

Have a question or problem that this article doesn't cover?
Ask our Ubuntu Mini 9 Google Group for help.

Check Out Dell's Mini 9 Repositories

Here are the repositories for Dell's Mini OS based on Ubuntu 8.04.:

deb http://dell-mini.archive.canonical.com/ubuntu/ hardy main universe multiverse restricted
deb-src http://dell-mini.archive.canonical.com/ubuntu/ hardy main universe multiverse restricted

deb http://dell-mini.archive.canonical.com/ubuntu/ hardy-updates main universe multiverse restricted
deb-src http://dell-mini.archive.canonical.com/ubuntu/ hardy-updates main universe multiverse restricted

deb http://dell-mini.archive.canonical.com/ubuntu/ hardy-security main universe multiverse restricted
deb-src http://dell-mini.archive.canonical.com/ubuntu/ hardy-security main universe multiverse restricted

deb http://dell-mini.archive.canonical.com/ubuntu/ hardy-netbook-base main universe multiverse restricted
deb-src http://dell-mini.archive.canonical.com/ubuntu/ hardy-netbook-base main universe multiverse restricted

deb http://dell-mini.archive.canonical.com/ubuntu/ hardy-dell-mini main universe multiverse restricted
deb-src http://dell-mini.archive.canonical.com/ubuntu/ hardy-dell-mini main universe multiverse restricted

Have a question or problem that this article doesn't cover?
Ask our Ubuntu Mini 9 Google Group for help.

Make a LiveUSB

From Wikipedia:
A live USB or USB live distro is a USB flash drive or an external hard disk drive containing a full operating system which can be booted. Live USBs are closely related to live CDs, and are sometimes used interchangeably. Like live CDs, live USBs can be used in embedded systems system administration, data recovery, or the testing of operating system distributions without committing to a permanent installation on the local hard disk drive.


Due to the lack of the Dell's Mini 9 optical drive a LiveUSB is the cheapest and easiest way to install Ubuntu. Before Ubuntu 8.10 Intrepid Ibex creating a LiveUSB was a real pain. Now thanks to usb-creator, making a LiveUSB is a three click process.

To install usb-creator in Ubuntu 8.10 Intrepid Ibex
In a termianl type:
sudo apt-get install usb-creator

To install usb-creator in Ubuntu 8.04 Hardy Heron
Download the .deb

You can find usb-creator under Applications>System Tools
Screenshot-Make USB Startup Disk

1. First you will need to a copy of Ubuntu. Be aware that there are issues with Ubuntu 8.04 on a LiveUSB, so you might be better off using 8.10 or newer.

2. Start usb-creator

3. Select you disc or iso image.

4. Select your usb based disk. Format if necessary.

5. Select how much storage you would like for your operating system.

6. Make your startup disk.

Have a question or problem that this article doesn't cover?
Ask our Ubuntu Mini 9 Google Group for help.

Wednesday, October 15, 2008

Dell's Custom User Interface Photo Gallery

The Defualt desktop and the Dell clutter launcher.
Screenshot_dell

Entertainment
Screenshot_entern

Games
Screenshot_games

Learn
Screenshot_lesrn

Productivity
Screenshot_pro
(why do I need Adobe Reader? Gnome reads and writes PDFs)

Web
Screenshot_web

Web Browser In Action (Dell's version of Firefox)
Screenshot_firefox
Google has a deal with Mozilla to be the default search engine for Firefox, since Dell doesn't see a dime of that money the decided to sell that privilege to Yahoo! In order to do so they cannot use the Firefox logo or name. Dell makes this worse by installing a Yahoo! toolbar onto their Web Browser. Firefox defiantly doesn't need a Yahoo! toolbar and it takes up way too much screen space. Thanks Dell! I bought the Dell Mini 9 with Ubuntu so I wouldn't get crapware.

I'm not a big fan of Dell Custom User Interface. It's slow and not my style. The good news is that it's easy to turn it off. You need to do is click the Ubuntu logo and select the Switch Desktop Mode entry.
Screenshot_switch

The Normal Desktop
Screenshot_norm
Ubuntu feels and runs much faster in this normal mode.

Have a question or problem that this article doesn't cover?
Ask our Ubuntu Mini 9 Google Group for help.