
Wednesday, September 30, 2009
Our One Year Anniversary
This month marks www.ubuntumini.com's one year anniversary. 12 months ago we started the site and pre-ordered our Dell Mini 9s. Since then we have covered 2 Ubuntu releases (gearing up for the 3rd), built up a Google Group help forum, written over 90 articles and watched as the community grew even after Dell discontinued the Mini 9 on May 29, 2009.
The site has had over:
- 248,000 unique visitors
- 405,000 visits to the site
- 866,000 page views
- From all over the world: readers in the Unites States, United Kingdom, Canada, Germany, Italy, France, Spain, Australia, Japan, Brazil and other equally awesome countries. Hopefully for my foreign readers my writing skills have gotten better over the year.
I started blogging about Ubuntu 3 years ago, originally about Ubuntu on Dell Inspiron 1501, and never thought my blogs would become as popular as they have. This coming year is going to be big for the blog. I have plans for reporting more Ubuntu news, highlighting more software, write more upgrading guides, upgrading the Flickr account so we can link to high resolution screenshots, opening up the site to Dell Mini 10v and Vostro A90 users, and writing about other Ubuntu derivatives. The site and Google group is going to change a bit and we'll be adding some new staff.
We are also having a big donation drive to raise enough money to buy new hardware (I'd like to get a Dell Mini 10v), better picture hosting and some equipment. I'm hosting the donation drive through www.chipin.com. If you can spare some green feel free to donate via the widget below.
Thanks for your support, contributions, feedback and donations!
Wednesday, September 23, 2009
Upgrading the Wireless Networking Card
This guide will go over how to correctly replace the WiFi card in the Dell Mini 9. It is a simple seven step process and only takes about five minutes. Upgrading the Mini's wireless card does have it's benefits, but isn't necessary. If you are happy with the Broadcom wireless card that comes with the Mini, if it works well, you don't need to upgrade.
After doing some research, I decided to go with the Intel WiFi Link 5100 Network adapter - PCI Express Mini Card. The Intel WiFi 5100 is a solid 802.11n (draft 2.0) wireless networking card that is fully supported in Linux. It will work out of the box in any distro running the 2.6.x Linux kernel. It worked without the need for additional drivers in Ubuntu, Xubuntu, Crunchbang Linux, Arch and Moblin. The Intel 5100 also offers faster connections to access points, wireless scanning support and the ability to sniff packets. The Broadcom card is slower to connect and does not support these features. You can find the Intel WiFi 5100 for under $30 with free shipping at Amazon.com and other retailers.
I also recommend the Intel WiFi Link 5300 Network adapter - PCI Express Mini Card. It is also 802.11n (draft) card but requires the installation of another antenna in your mini behind the LCD panel, instructions can be found here. You can find high quality Tyco antennas on ebay for about $3 with free shipping. Installing a 3rd antenna improves signal quality but is a labor intensive task.
If you're looking for a 802.11g card the Intel Pro/Wireless 3945ABG Mini PCI Express Network Card is an excellent choice.
1. Remove the Battery
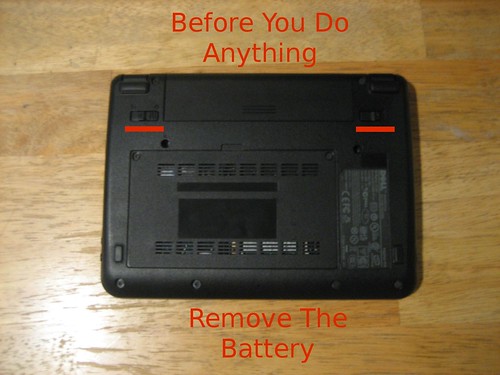
- Slide the battery release tabs outwards to unlock the battery
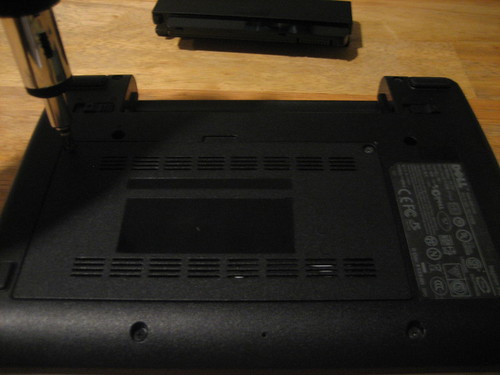
2. Unscrew the Back Panel
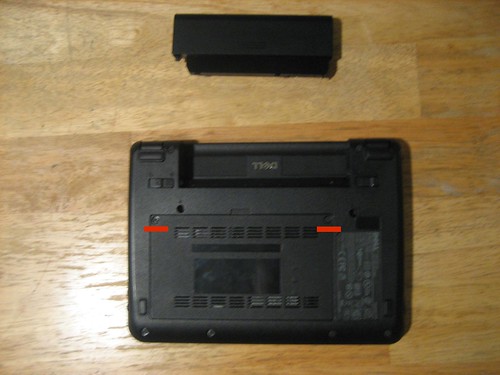
- With a Philips/flathead screwdriver carefully remove the two screws holding the Mini's back plate.
3. Locate The Wireless Network Card

- It directly under the RAM module, in the the bottom right quadrant.
4. Remove The Old Card
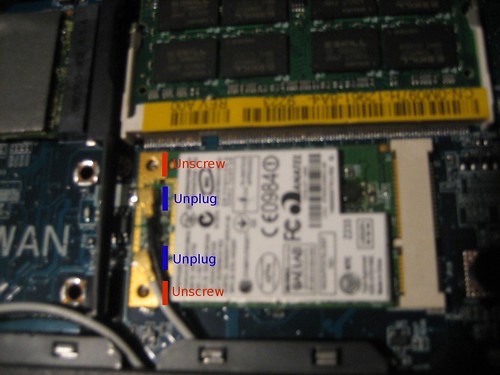
- Remove the two screws holding the card in place
- Gently pull the card out of the socket
- Apply light pressure to unplug the antenna cables
5. Install the New Card
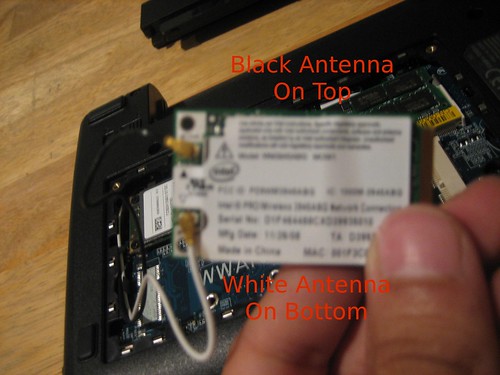
- Reconnect the antenna cables. Black on top, white on bottom.
- Place the two screws into the holes. I found that placing them in first is easier than trying to fit them in after then card is in place.
- Carefully slide the card back into the socket. Use the notch at the bottom of the card as a guide and remember antennas should be facing up)
- Tighten the two screws to secure the network card in place
6. Properly Secure The Antenna Cables
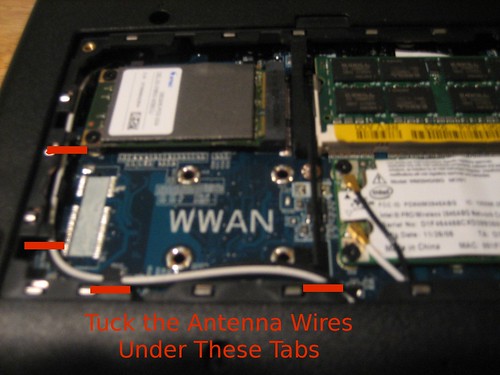
- Placing the antenna cables under the four highlighted tabs. This will keep them from getting in the way or from getting damaged.
7. Replace The Back Panel and Battery
Once you have powered up your Mini, in a terminal type:
ifconfig
-This command will list the network interfaced recognized by the OS. The Intel cards should show up as wlan0.
Now to get to cracking.
After doing some research, I decided to go with the Intel WiFi Link 5100 Network adapter - PCI Express Mini Card. The Intel WiFi 5100 is a solid 802.11n (draft 2.0) wireless networking card that is fully supported in Linux. It will work out of the box in any distro running the 2.6.x Linux kernel. It worked without the need for additional drivers in Ubuntu, Xubuntu, Crunchbang Linux, Arch and Moblin. The Intel 5100 also offers faster connections to access points, wireless scanning support and the ability to sniff packets. The Broadcom card is slower to connect and does not support these features. You can find the Intel WiFi 5100 for under $30 with free shipping at Amazon.com and other retailers.
I also recommend the Intel WiFi Link 5300 Network adapter - PCI Express Mini Card. It is also 802.11n (draft) card but requires the installation of another antenna in your mini behind the LCD panel, instructions can be found here. You can find high quality Tyco antennas on ebay for about $3 with free shipping. Installing a 3rd antenna improves signal quality but is a labor intensive task.
If you're looking for a 802.11g card the Intel Pro/Wireless 3945ABG Mini PCI Express Network Card is an excellent choice.
1. Remove the Battery
- Slide the battery release tabs outwards to unlock the battery
2. Unscrew the Back Panel
- With a Philips/flathead screwdriver carefully remove the two screws holding the Mini's back plate.
3. Locate The Wireless Network Card
- It directly under the RAM module, in the the bottom right quadrant.
4. Remove The Old Card
- Remove the two screws holding the card in place
- Gently pull the card out of the socket
- Apply light pressure to unplug the antenna cables
5. Install the New Card
- Reconnect the antenna cables. Black on top, white on bottom.
- Place the two screws into the holes. I found that placing them in first is easier than trying to fit them in after then card is in place.
- Carefully slide the card back into the socket. Use the notch at the bottom of the card as a guide and remember antennas should be facing up)
- Tighten the two screws to secure the network card in place
6. Properly Secure The Antenna Cables
- Placing the antenna cables under the four highlighted tabs. This will keep them from getting in the way or from getting damaged.
7. Replace The Back Panel and Battery
Once you have powered up your Mini, in a terminal type:
ifconfig
-This command will list the network interfaced recognized by the OS. The Intel cards should show up as wlan0.
Now to get to cracking.
| Have a question or problem that this article doesn't cover? Ask our Ubuntu Mini 9 Google Group for help. |
Wednesday, September 16, 2009
Configure Synaptic Touchpad
This is partially a howto and mostly an informational guide on how to get the most out of your touchpad.
You used to be able to configure your mouse/touchpad settings in Ubuntu by editing your xorg.conf file. With Ubuntu 9.10 there will no longer be an xorg file to edit. The input driver has moved from xorg to hal and you have to edit an fdi file to properly configure your touchpad.
1. Enable SMHconfig
* Note: This method is not secure if you are in an untrusted multiuser environment. All local users can change the parameters at any time.
In a terminal type:
sudo gedit /etc/hal/fdi/policy/shmconfig.fdi
- Then copy this text into that file.

- Log Out/Reboot for the settings to take effect
2. Display Your Current Settings
In a terminal type:
In a termianl type:
3. Create An .fdi File
In a terminal type:
In a terminal type:
- Copy and paste the contents into your 11-x11-synaptics.fdi file.
- You can opt to use this file for your touchpad settings; it has vertical/horizontal scroll and emulated middle click enabled.
5. Edit the 11-x11-synaptics.fdi File
- It is written in Extensible Markup Language (xml)
- You can read the the synaptic manual here or output into a terminal with:
- Template follows the output of syndaemon -d && synclient -l and it is intelligently laid out by function.
- You must log out or restart HAL for the settings to take effect.
To restart HAL in a terminal type:
You used to be able to configure your mouse/touchpad settings in Ubuntu by editing your xorg.conf file. With Ubuntu 9.10 there will no longer be an xorg file to edit. The input driver has moved from xorg to hal and you have to edit an fdi file to properly configure your touchpad.
1. Enable SMHconfig
* Note: This method is not secure if you are in an untrusted multiuser environment. All local users can change the parameters at any time.
In a terminal type:
sudo gedit /etc/hal/fdi/policy/shmconfig.fdi
- Then copy this text into that file.
- Log Out/Reboot for the settings to take effect
2. Display Your Current Settings
In a terminal type:
syndaemon -d && synclient -l
- This will show you what your current/default settings are. Copy them into a blank file. You will use this a reference point.In a termianl type:
synclient -m 10
- This will show, in real time, the output of your touchpad. Another tool to use as reference for editing your file.3. Create An .fdi File
In a terminal type:
sudo mkdir /etc/hal/fdi/policy/10osvendor/
- This will make a folder for the 11-x11-synaptics.fdi fileIn a terminal type:
sudo gedit /etc/hal/fdi/policy/10osvendor/11-x11-synaptics.fdi
- Creates a black configuration file.
- Download my 11-x11-synaptics.fdi templete- Creates a black configuration file.
- Copy and paste the contents into your 11-x11-synaptics.fdi file.
- You can opt to use this file for your touchpad settings; it has vertical/horizontal scroll and emulated middle click enabled.
5. Edit the 11-x11-synaptics.fdi File
- It is written in Extensible Markup Language (xml)
- You can read the the synaptic manual here or output into a terminal with:
man synaptics
- The Synaptic manual will define the terms included within the .fdi file.- Template follows the output of syndaemon -d && synclient -l and it is intelligently laid out by function.
- You must log out or restart HAL for the settings to take effect.
To restart HAL in a terminal type:
sudo /etc/init.d/hal restart
- restarting HAL theoretically should work but i did not work for me. I had to log in and out.| Have a question or problem that this article doesn't cover? Ask our Ubuntu Mini 9 Google Group for help. |
Sunday, September 13, 2009
Set Gmail As Your Default Mail Client In Firefox
I do not use Kmail, Evolution or Thunderbird on my netbook. So when I click an email link in Firefox, I get sent to the Evolution's setup screen. This guide will show you how to setup Gmail as you default email application in Firefox. That way, when you click a mailto link (or any email link) Firefox will open it with Gmail. *Note: this only works in Firefox 3.0 and above.
1. Go to Gmail and sign in.
2. While in Gmail, copy and paste the code below into Firefox's address bar and hit enter.
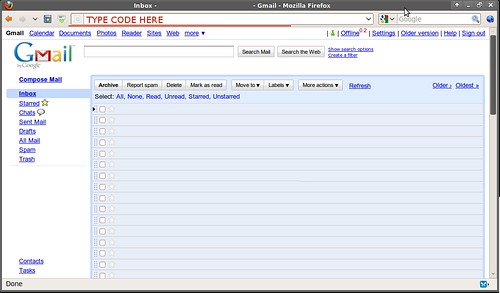
3. A bar will appear under the URL bar, click "Add Application"

- to add Gmail as an application for mailto links.
4. Then go to Edit>Preferences
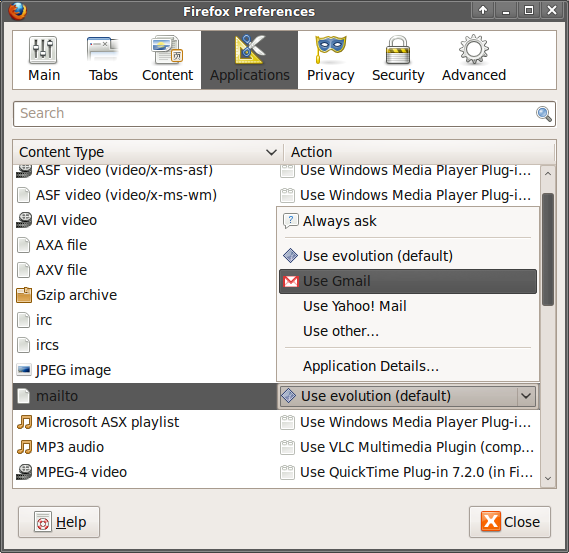
- In the Application tab, under mailto select use Gmail
1. Go to Gmail and sign in.
2. While in Gmail, copy and paste the code below into Firefox's address bar and hit enter.
javascript:window.navigator.registerProtocolHandler("mailto","https://
mail.google.com/mail/?extsrc=mailto&url=%s","Gmail")
3. A bar will appear under the URL bar, click "Add Application"
- to add Gmail as an application for mailto links.
4. Then go to Edit>Preferences
- In the Application tab, under mailto select use Gmail
| Have a question or problem that this article doesn't cover? Ask our Ubuntu Mini 9 Google Group for help. |
Friday, September 11, 2009
Make Your Root Windows Pretty
When modfying your system theme the changes often do not apply to the root account. When running programs as the super user (sudo) the window theme looks likea very ugly Windows 95 clone. With two lines of code we are going to link your user and root themes so they match, and bring back the pretty in Ubuntu.
- Notice the Windows 98 feel to these root menus
In a terminal type:
- Now when you run programs as the super user they match the system theme.
and as synthetic098 pointed out:
In a terminal type:
sudo ln -s ~/.fonts /root/.fonts
- to symbolically link your fonts to the root fonts
- Notice the Windows 98 feel to these root menus
In a terminal type:
sudo ln -s ~/.themes /root/.themes
sudo ln -s ~/.icons /root/.icons
- Now when you run programs as the super user they match the system theme.
and as synthetic098 pointed out:
In a terminal type:
sudo ln -s ~/.fonts /root/.fonts
- to symbolically link your fonts to the root fonts
| Have a question or problem that this article doesn't cover? Ask our Ubuntu Mini 9 Google Group for help. |
Wednesday, September 9, 2009
Hack Karmic's GDM Login Screen
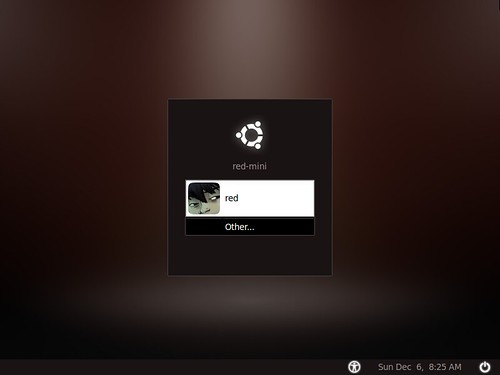
One of my favorite things about Linux is the ability to customize everything. The Gnome Display Manager (GDM) is an excellent example. A quick look at gnome-look.org illustrates the diversity and choice Linux users have for a screen they might only see for 5 seconds.
Changing your GDM was once a simple processes with an excellent GUI behind it. With Ubuntu 9.10 Karmic Koala the GDM has been rewritten to properly take advantage of xsplash, Ubuntu's new X based boot. While these changes will significantly improve boot time, customizable GDMs are going to suffer. Ubuntu developers have already stated that a level of customization once offered with the old GDM will not be available for Karmic.
Until then we can hack the GDM to change the background, theme, fonts and some minor features. While not as robust as before, it's better then the ugly brown sand option that Karmic testers are stuck with.
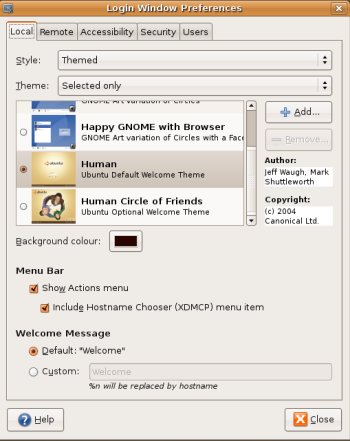
- This is th old GDM configuration screen. notice the options and themes you can choose from.
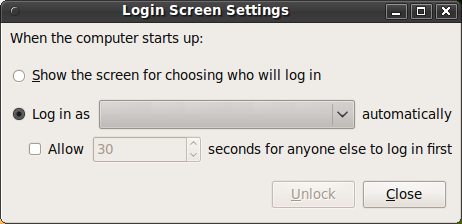
- This is the new GDM screen. Not many options.
1. Logout of your current session and return to the GDM
2. Switch to the tty command line prompt using Ctrl-Alt-F1
3. Login using your normal login/password
4. at the command line prompt type: export DISPLAY=:0.0
5. then type: sudo -u gdm gnome-control-center
6. Switch back to the gdm screen using ALT-F7
7. The gnome-control-center should be loaded. Use it to configure your GDM.
8. Click on the Appearances icon, in appearances you can change your GDM's font, theme and background image.
9. Close the gnome-control-center and login normally.
For more GDM hacks check out part two of this article.
| Have a question or problem that this article doesn't cover? Ask our Ubuntu Mini 9 Google Group for help. |
Saturday, September 5, 2009
Fix Most Audio Problems: Remove PulseAudio
Many audio issues in Ubuntu can simply be solved by eliminating PulseAudio. The Mini 9's Skype problems are PulseAudio's fault.
PulseAudio is a sound server, a background process accepting sound input from one or more sources (processes or capture devices) and redirecting it to one or more sinks (sound cards, remote network PulseAudio servers, or other processes).
One of the goals of PulseAudio is to reroute all sound streams through it, including those from processes that attempt to directly access the hardware. What it really does is get in the way, delay sound, improperly fix and make audio in Linux a bigger mess. PulseAudio may have potential and offer some great audio features but for me it is not worth the headaches. I don't need advanced features and networked audio, I simply want to watch videos, listen to music and talk on Skype without problems.
To completely remove PulseAudio in a terminal type:
This will uninstall PulseAudio, delete the configuration files and uninstall it's dependencies; gstreamer-10-pulseaudio, libpulse-browse0, libpeexdsp1, pulseaudio-esound-compat, pulseaudio-module-udev, pulseaudio-module-x11, pulseaudio-utils, and rtkit.
Reboot your machine and enjoy working audio. Not having PulseAudio installed makes using Skype as easy as starting the program. You still need to turn on the mic and setup the correct audios devices.
- Select alsa for for all options in /system/preferences/sound
- If you need help or have issues refer to the Ubuntu Wiki page on PulseAudio.
If you ever want to go back to using PulseAudio you can reinstall it by typing in a terminal:
Feel free to bash PulseAudio in the comments and let everyone know how your audio quality improved.
PulseAudio is a sound server, a background process accepting sound input from one or more sources (processes or capture devices) and redirecting it to one or more sinks (sound cards, remote network PulseAudio servers, or other processes).
One of the goals of PulseAudio is to reroute all sound streams through it, including those from processes that attempt to directly access the hardware. What it really does is get in the way, delay sound, improperly fix and make audio in Linux a bigger mess. PulseAudio may have potential and offer some great audio features but for me it is not worth the headaches. I don't need advanced features and networked audio, I simply want to watch videos, listen to music and talk on Skype without problems.
To completely remove PulseAudio in a terminal type:
sudo apt-get purge pulseaudio
This will uninstall PulseAudio, delete the configuration files and uninstall it's dependencies; gstreamer-10-pulseaudio, libpulse-browse0, libpeexdsp1, pulseaudio-esound-compat, pulseaudio-module-udev, pulseaudio-module-x11, pulseaudio-utils, and rtkit.
Reboot your machine and enjoy working audio. Not having PulseAudio installed makes using Skype as easy as starting the program. You still need to turn on the mic and setup the correct audios devices.
- Select alsa for for all options in /system/preferences/sound
- If you need help or have issues refer to the Ubuntu Wiki page on PulseAudio.
If you ever want to go back to using PulseAudio you can reinstall it by typing in a terminal:
sudo apt-get install pulseaudio
Feel free to bash PulseAudio in the comments and let everyone know how your audio quality improved.
| Have a question or problem that this article doesn't cover? Ask our Ubuntu Mini 9 Google Group for help. |
Tuesday, September 1, 2009
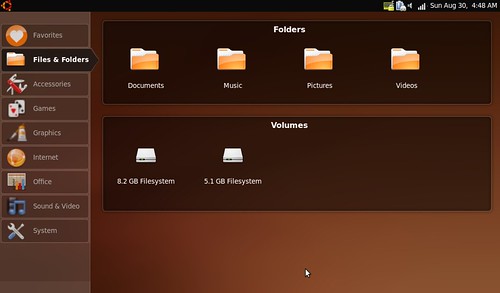
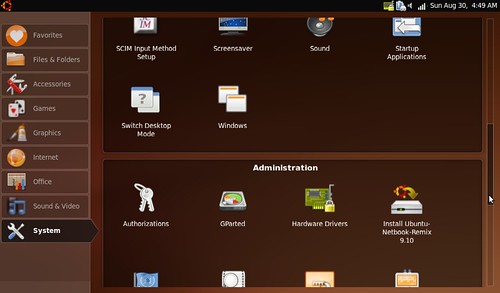
Ubuntu Netbook Remix UI Gets Tweaked Again
Ubuntu 9.10 Karmic Koala Alpha 4 brings another Ubuntu Netbook Remix user interface redesign. The colors has been lighted, the menus now dynamically resize to allow more of the background to be seen and launcher animations have returned.
Favorites-
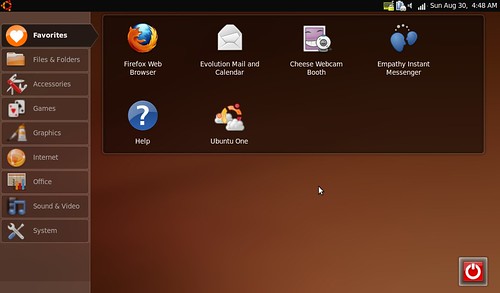
Files & Folders-
System Preferences & Administration
Launcher Animations-

If you want to try out Ubuntu 9.10 Alpha 4, you can download it here
Favorites-
Files & Folders-
System Preferences & Administration
Launcher Animations-
If you want to try out Ubuntu 9.10 Alpha 4, you can download it here
| Have a question or problem that this article doesn't cover? Ask our Ubuntu Mini 9 Google Group for help. |
Subscribe to:
Comments (Atom)