Why wait in front of a store on Thanksgiving and run the risk of being trampled? Dell is offering it's own Black Friday deal, a new Vostro A90 8.9 inch netbook for $184. The Vostro is the all black business edition of the Dell Mini 9.
The base model includes:
- Intel Atom Processor N270 (1.6GHz/533Mhz FSB/512K cache)
- 8.9 Inch Wide Screen WSVGA TL Display (1024x600)
- Intel Graphics Media Accelerator (GMA) 950
- Broadcom Wireless 802.11g Mini Card
- Bluetooth 2.1 module
- Integrated 0.3M Pixel Webcam
- 1GB of DDR2 533MHz RAM
- 8GB Solid State Drive
- 35WHr Battery (4 cell)
- 1 year Limited Warranty
Phoronix is a Linux technology website focusing on product reviews, distribution screenshots, interviews, and news. Today they released a benchmark comparison between Chromium OS, Moblin, Ubuntu Netbook Remix. Ubuntu 9.10 Karmic Koala did extremely well.
"Well, these results were certainly interesting to say the least and surprised us in some areas. When it came to our netbook performance tests from the desktop, there were not too many dissenting test results between the gaming, video playback, encoding, and disk test profiles. However, for those tests that did differ, Ubuntu Netbook Remix 9.10 usually came out in front as being the best performer."
These test were done with a Samsung NC10. The NC10 is almost identical to the Dell Mini 9/10v and Vostro A90, they all use the Intel Atom N270 processor and Intel 945GME + ICH7-M Chipset with the standard Intel 945 integrated graphics at a resolution of 1024 x 600 .
While I am not the biggest fan of Ubuntu Netbook Remix this release, the results hold true for the standard Ubuntu release. All Ubuntu Karmic Mini/Vostro users should be satisfied that their operating system is preforming nicely against the competition.
This guide will show you how to flawlessly join two video files. Perfect for when your legal copy of Star Trek gets downloaded as two separate files.
To do this, we are going to use Avidemux, a free open-source program designed for multi-purpose video editing and processing.
In a terminal type:
sudo apt-get install avidemux
- To install the gtk version of avidemux
1. Open the first part of your video
2. Unpack the bitstream
3. Under Audio select Build VBR Time Map
4. Under File select append (Ctrl+Alt+A) to select you next video file
5. Unpack the bitstream
6. Under Audio select Build VBR Time Map
7. Continue unpacking the bitstream and rebuilding VBR time map if you have more videos to append to this file.
8. Save the file
Frozen Bubble is a free software clone of Puzzle Bobble. The only difference is instead of using cute dragons as avatars, they use cute penguins. Penguins>dragons.
You job is to eliminate the colored balls from the playing area. Link three or more balls of the same color and they fall down. Every few shots, the ceiling of the playing arena will drop down, along with all the balls stuck to it.
Frozen Bubble contains 100 single player levels, completive 2p/3p/4p/5p multi-player over LAN or internet, a level-editor, 3 professional quality digital soundtracks and 15 stereo sound effects.
To install Frozen Bubble
in a terminal type:
sudo apt-get install frozen-bubble
Works great on the Dell Mini/Vostro, no special configuration needed. Be warned this game was so addictive it supposedly lead to a delay in Debian a few years back.
Adobe has just released Flayer Player 10.1 Beta for 32-bit Linux Machines. While 10.1 Beta is not the release that will fix users flasher player woes in Linux, it will offer better playback, bug fixes and greater compatibility for flash content on the web.
From Adobe's Press Release: This is a developer prerelease version of the Adobe® Flash® Player 10.1 software for Windows, Macintosh and Linux. It is being made available for developers to test their content to ensure new features function as expected, existing content plays back correctly, and there are no compatibility issues. Consumers can try the beta release of Flash Player 10.1 to preview hardware acceleration of video on supported Windows PCs and x86-based netbooks.
To Install Flash Player 10.1 Beta in Linux: - Close Firefox
- After downloading you need to uninstall Ubuntu's version of Flash sudo apt-get purge flashplugin-installer
- Then create a plugin folder in the .mozilla configuration folder. mkdir ~/.mozilla/plugins
- Untar flashplayer10_1_p1_linux_111709.tar.gz in a terminal type: tar -zxvf flashplayer10_1_p1_linux_111709.tar.gz
- Point the terminal into the newly decompressed file cd ~/install_flash_player_10_linux
- Install the flash player 10.1 beta plugin In a terminal type: mv libflashplayer.so ~/.mozilla/plugins
- To remove Flash Player 10.1 Beta and reinstall Ubuntu's repository version of flash Delete the plugins folder in the .mozilla folder In a terminal type:
sudo apt-get install flashplugin-installer
Leave a comment letting readers now how the upgrade worked for you.
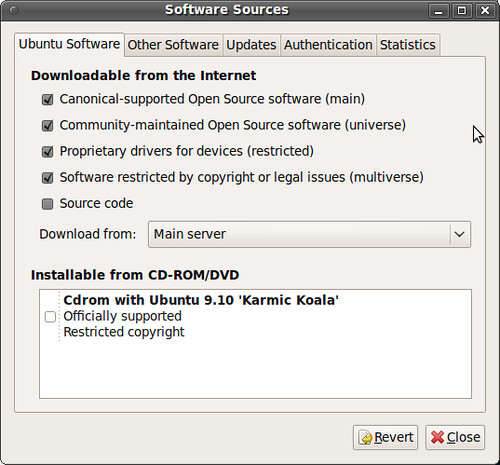
If your Karmic updates are running slower than normal it is probably because of the influx of new users is hammering the main Ubuntu servers. You can dramatically increase the speed of your Ubuntu package downloads by changing your software repository. The packages from these mirrors is exactly the same as the main Ubuntu servers but don't suffer from server overload.
Go to software sources System>Administration>Software Sources
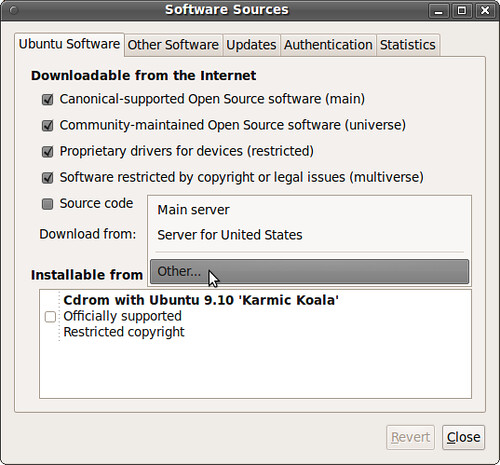
Select "Other..." from the pull down menu under Download from:
You can select a new mirror from the list on the left or run the a server test by selecting Select Best Server from the upper right corner.
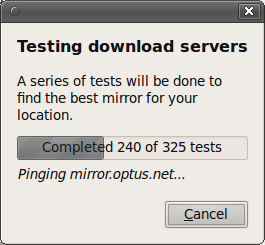
A series of test will be preformed to find the best mirror for your location.
When the test is done, it will highlight the faster mirror available to you.
Click Choose Server and allow your sources to be reloaded.
Now you have the fastest mirror available to you. Enjoy the increase in your speed!
Don't expect the hack to be a magical speed boost option but it does help with tearing and choppiness. Hopefully Adobe will one day fix flash in Linux instead of giving us workarounds.
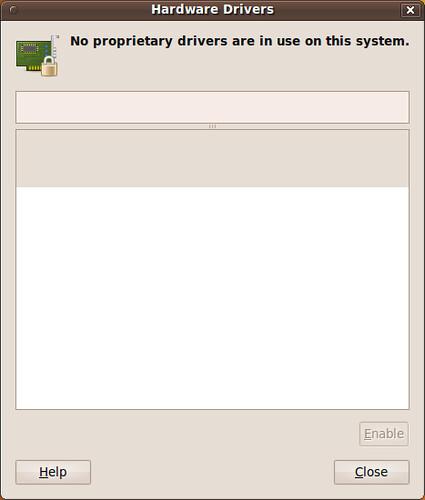
Usually installing the proprietary Broadcom wireless driver in Ubuntu is handled with couple mouse clicks by the Hardware Drivers (aka jockey-gtk). But Ubuntu 9.10 Karmic Koala has shipped with a bug that makes jockey unable to recognize the card and install the driver. No worries, the fix is incredibly easy and only requires a wired internet connection.
- Ubuntu is unable to recognize and install the Broadcom Driver via the Hardware Drivers.
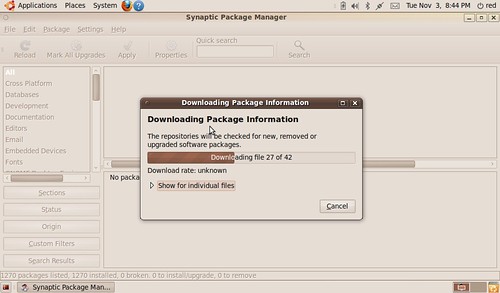
First connect to the internet via a wired connection. Then go to Synaptic Package Manager (System>Administration>Synaptic Package Manager)
- Click the Reload button in the upper left corner of Synaptic to refresh your repository index.
- Then install the bcmwl-kernel-source package
OR: after connecting to the internet via a wired connection in a terminal type:
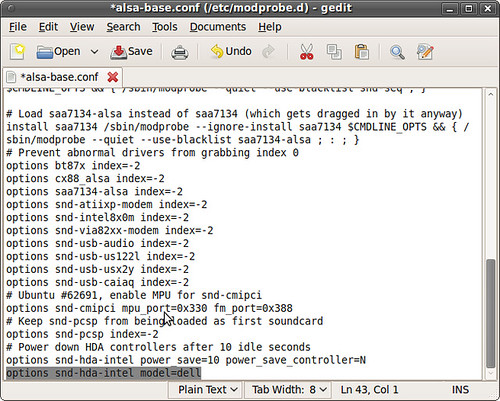
Even though the Dell Mini 9 and the Dell Vostro have identical components, the audio for the Vostro doesn't work out of the box like it does for the Mini 9.
In order to enable audio you need to add a line to your /etc/modprobe.d/alsa-base.conf file. - In a terminal type:
sudo gedit /etc/modprobe.d/alsa-base.conf
- Then add this to the bottom of the alsa-base.conf file:
options snd-hda-intel model=dell
- Then reboot the machine for the changes to take effect.
2. Prepare Your Install Media
- I prefer to use my external DVD drive but you can also use a LiveUSB stick to install Ubuntu. Follow these directions for creating a LiveUSB image and check our usb flash drive compatibility list for recommendations on drives.
3. Boot Into Your Install Media
- By default the Mini 9/10v and Vostro boot from the hard disk first, you need to tell the mini to boot into your install media.
- Boot your PC, when the Dell splash logo appears hit the zero (0) key to access your one time boot list. Use the DVD/CD drive option if installing from disc or the Removable Devices option for a LiveUSB install.
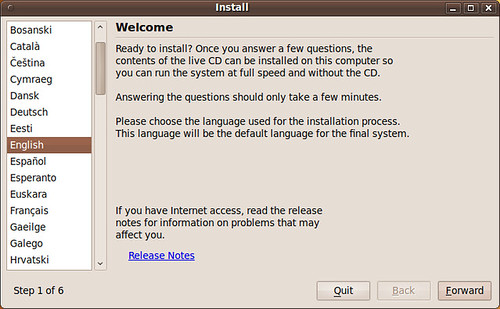
4. Installing Ubuntu 9.10 Karmic Koala
Step 1 - Choose Your Install Language
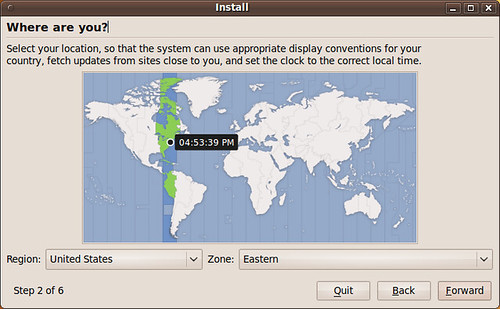
Step 2 - Choose Your Location
Step 3 - Choose Keyboard Layout
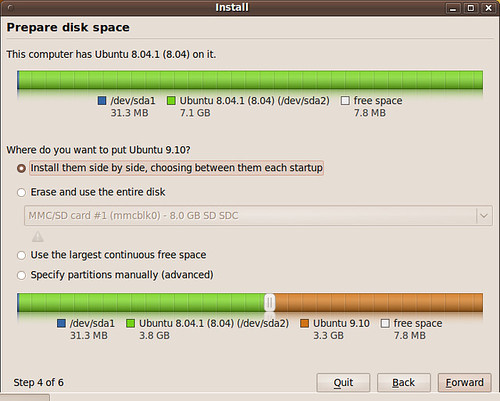
Step 4 - Partitioning the Disk
- There are three options for installing Ubuntu
If you plan on dual booting you may want to choose the Install them side option. A slider will appear and allow you to resize your partitions. This method is recommended for users that are uncomfortable with manually partitioning their drives but want to dual boot. Make sure to defragment your Windows drive before you install Ubuntu so you don't lose data.
Erase and use the entire disk is not recommended. If you plan on deleting the whole hard disk and not dual booting booting it is recommended that you partition the drive manual using the last option, it is easy and allows you to separate your /root and /home partitions. Doing this is great to protect against data loss if your install/upgrade goes bad later.
Specify partitions manually is recommended and not hard. The rest of the install guide will focus on it. It is the best way to install Ubuntu on your Dell Mini/Vostro.
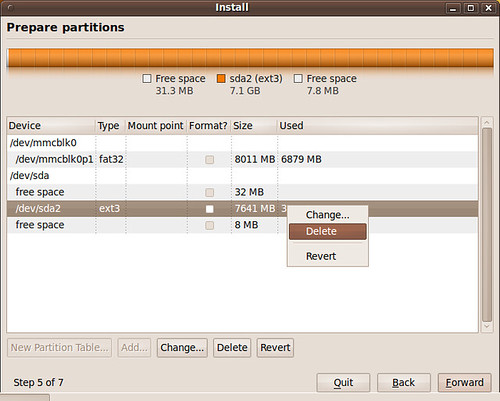
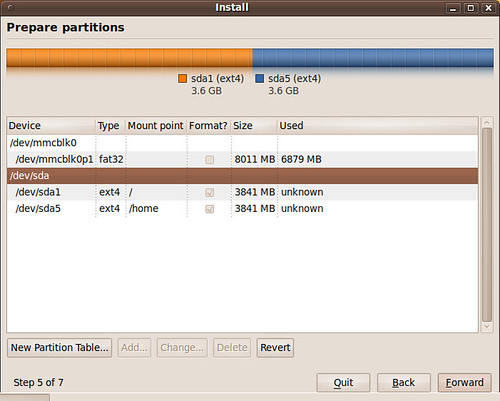
- Ignore the /dev/mmcblk0p1 in the picture, it is my SD card. I had it in while installing to save screenshots on.
- Your Mini/Vostro hard drive will be /dev/sda
- Right click the partition to delete/resize it.
- Depending on your space you have some options/decisions.
- For this guide will will be preforming a clean install with a separate /root and home partition on a 8GB SSD.
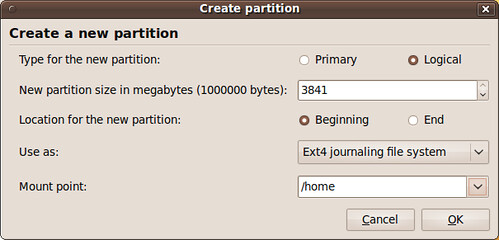
- After freeing hard drive space for Ubuntu, right click your free space and select add to create a /root partition
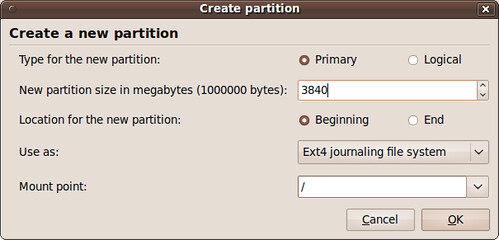
- Your /root should be at least 2GB but realistically closer to 4GB to avoid future problems. The root partition is where the operating system and programs are stored. I chose to use half the size of my 8GB drive for my /root partition but could have safely went as low as 2.5GB - 3GB.
- 1GB = 1024 megabytes
- The /root partition type should always be primary, start at the beginning and its mount point is /
- The file system selection is up to you, Ext4 is recommended and the fastest. Other users prefer Ext3 for its rock solid stability or Ext2 because it does not journal. Journaling protects against data corruption in the case of a power failure or system crash but it also writes more frequently to the solid state disk. Most users will want to Use Ext4, it is Ubuntu's default section.
- Your Home folder will be the rest of your hard drive space. The home partition is where all your personal data and program settings are stored.
- The /home partition type is logical, should start at the beginning and its mount point is /home
- Again the file system selection is up to you, Ext4 is recommended.
- As you can see I split my 8GB drive in two, half for my operating system /root and half for my personal files and settings /home.
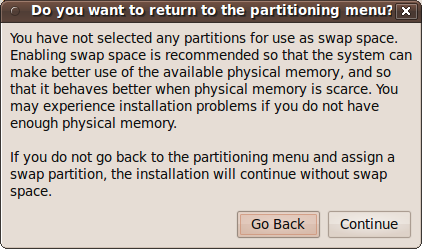
- After clicking forward you will see this pop message. This guide does not create a swap partition for Ubuntu. Swap is used by the operating system to store and retrieve data from secondary storage for use in main memory. It is not really need and if you don't have a large drive it is unnecessary.
- You can chose to go back and resize you partitions to create a swap partition. A 1GB swap partition is recommended, anything more would be overkill on a netbook.
- If you want to hibernate your Mini/Vostro you will need to create a swap partition.
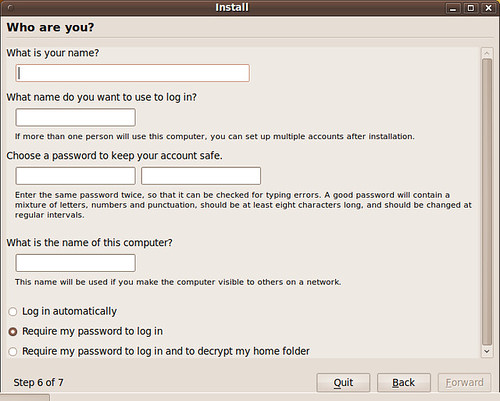
Step 6 - Who Are You?
- Enter your information, user name and password.
- You can choose to encrypt your home folder. There is a slight performance hit if you choose to encrypt your home folder but it is negligible. I have two identical drives STEC SSD drives, one is encrypted and one unencrypted, I can not tell the difference between the two.
- Encryption is a good idea if you travel, are paranoid, or just don't want anyone accessing your files.
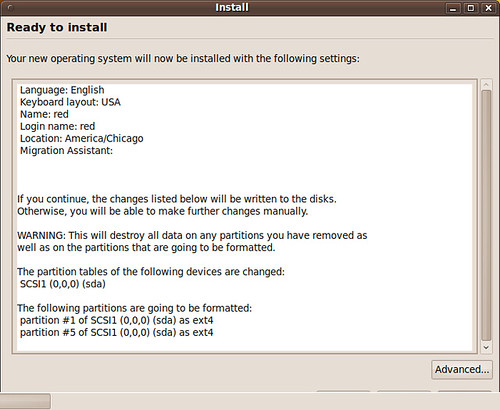
- This is the final check list before hitting install. Make sure everything is correct and begin the installation.
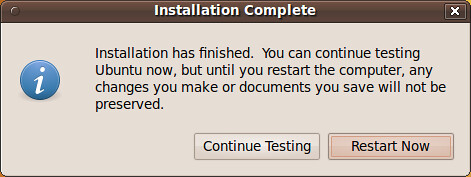
- Reboot the machine so we can fix the wireless card driver and the audio on the Vostro A90.
5. Install The Broadcom Wireless Card Driver
- Usually installing the proprietary Broadcom wireless driver in Ubuntu is handled with couple mouse clicks by the Hardware Drivers (aka jockey-gtk). But Karmic has shipped with a bug that makes jockey unable to recognize the card and install the driver.
- First connect to the internet via a wired connection.
- Then go to Synaptic Package Manager (System>Administration>Synaptic Package Manager)
- Click the Reload button in the upper left corner of Synaptic to refresh your repository index.
- Then reinstall the bcmwl-kernel-source package
- Click to enlarge
OR: after connecting to the internet via a wired connection in a terminal type:
Desktop-switcher is an application that allows you to switch between Ubuntu Netbook Remix's user interface and the standard Ubuntu Gnome interface. It has been plagued with bugs and problems since Ubuntu 8.04. Desktop-switcher has killed many desktops and has lead to some very frustrating moments for users, and wasn't getting any more stable. While desktop-switcher was available during Karmic's pre-release, Ubuntu 9.10 shipped without desktop-switcher.
The architecture/design of desktop-switcher of trying to update the live configuration (GConf settings and others) makes it really fragile and error prone; desktop-switcher also takes some backups of gconf settings in ~/ and attempts to restore them, which creates more code pathes and potential problems. It's easy to end up in a completely broken setup with some minutes of playing.
desktop-switcher was intended to help hardy UNR users to disable clutter/opengl when their setup didn't support that nicely. Nowadays, we except these to just work, so it's kind of not required.
Finally, desktop-switcher duplicates the settings from ubuntu-netbook-remix-default-settings, so we need to update two places when we change them,
In karmic+1, we'd like to implement this feature by having an UNR session on the GDM screen along GNOME, that would be a much more solid and clean design. This would also solve the duplication.
So to sum up, we'd like to unseed desktpo-switcher in karmic's UNR and revisit this differently in lucid. We will still attempt to fix top issues if time and complexity of the fixes permit.
UNR is an excellent desktop environment but sometimes the "standard" Ubuntu desktop is better suited for some tasks. Not having the desktop-switcher really hurts UNR usability and because of this I am dropping UNR support on the blog. Until desktop-switcher returns I cannot use/support a broken user interface. I am excited to try the new dekstop-switcher implementation in the pre-release of Ubuntu 10.04 , but until then I'm focusing on other things.
This saddens me, as many of you know I'm a huge fan of Ubuntu Netbook Remix and loved using it even though it was slow, bloated and clunky.
Gigolo is a frontend to easily manage connections to remote filesystems using GIO/GVfs. It allows you to quickly connect/mount a remote filesystem and manage bookmarks of those filesystems.
As many of you have noticed Ubuntu 9.10 Karmic Koala has been released without a mention on the site. I am sorry, I was coming back from a college visit to Southern Illinois University when my car hit a tarp on the road. Due to the heavy rain I didn't see it and hydroplaned off the highway rolling over twice. It was pretty scary.
Without a doubt, seat belts save lives. I am banged up but still alive. So is my Mini, it was tossed around the back but survived without a scratch.
I'll be back in Chicago on Tuesday and start updating the site. Until then hit up the google group if you need help.
You can see the complete slideshow of the damage to my vehicle here.
Thanks For Donating: ***Ioakeim Karakotsoglou*** Clayton Lively Zachariah George Ambrose Barry Lionel Smith
Adam Carter
Jerome Rosenberger James Dunne Michael Ditto Laurence Schwarz Staci Wilhelm Ed Seery Juan Carlos del Caño Sánchez Andre Alforque Natashe Firoos Khan John Campbell Richard Kurtin David Vázquez Cañoto Thomas Ullrich Frédéric Dugué Hamid Hafaoui Nathan Jones Warren Harrell Olney England Steven Brown Philippe Cordel Lee Balcom Scott Fortney Lawrence Rice Peter Van Kann Dennis Jones Judson Dunn Houston R. Allen William Hennan David Decker William Hennan Gerld Graff Gregory Ramey Asheville Technologies Lori Perez