Tuesday, December 30, 2008

Install a TTF Font, Microsoft Core Fonts & Ubuntu Font

To Install a TTF Font
Step 1:
Prepare your files
YouFont is a good place to start, there are countless free font site out there. Feel free to leave a link in the comments section of your favourites. If the font is compressed (tar, zip, rar, etc) uncompress it (right click>Extract Here). Fonts should end in the extension .ttf for this guide to work.

Step 2: Now make a directory for your custom ttf fonts
in a terminal type:
sudo mkdir /usr/share/fonts/truetype/custom

Step 3: Put the ttf font into the folder your created
In a terminal type:
sudo nautilus

This will bring up a nautilus window
go to /usr/share/fonts/truetype/custom
Copy your fonts into this folder

Step 4: Rebuild your font cache
In a terminal type:
sudo fc-cache -f -v

To install the free Microsoft core fonts and increase compatibility in OpenOffice
In a terminal type:
sudo apt-get install msttcorefonts

Install the Ubuntu title font, used to create the blog's header and logo
In a terminal type:
sudo apt-get install ttf-ubuntu-title

Have a question or problem that this article doesn't cover?
Ask our Ubuntu Mini 9 Google Group for help.

Saturday, December 27, 2008

Aircraft Manager: Save Battery By Turning Off WiFi and Bluetooth

This guide in for Ubuntu 8.04 & 8.10, for Ubuntu 9.04 use this guide

One of the sacrifices I had to make when choosing to install Ubuntu 8.10 was that there would be no way to turn off WiFi and/or Bluetooth. The battery would drain faster from keeping them powered, even when not in use.

Dell released Aircraft Manager, a program for turning these devices off, in lpia form, for Ubuntu 8.04 when the Mini was first shipped. Seeing how I was not running an lpia system, I was hesitant to install the package. Recently it was brought to my attention that there is a Aircraft Manager.deb usable in both i386 and lpia systems.

Download the Aircraft Manager .deb

Once installed, you can find Aircraft Manager in System>Preferences, under the title Airplane Mode
find_airplane

It allows you to turn off WifFi, Bluetooth, or both
Screenshot-Airplane Mode

And you can also put the Mini into Airplane Mode for safe usage while flying
Screenshot-Airplane Mode-1
Since someone asked:
The reason flights ban laptops is that they emit radio waves. All wireless devices do, and the navigation and flight control computers on airplanes are designed to sense even very weak signals coming from far away. Radio waves with just the right power and frequency can, in theory, introduce errors in computing equipment.

Have a question or problem that this article doesn't cover?
Ask our Ubuntu Mini 9 Google Group for help.

Wednesday, December 24, 2008

Welcome!

Over the next couple of days many of you will be receiving your Mini 9s and finding your way to my blog. I want to welcome you, www.ubuntumini.com was created as a resource for people who wanted to install Ubuntu on their Dell Mini.

This website is not about running Mini OS, the pre-installed Dell version of Ubuntu. The pre-installed version is based on the Low Power on Intel Architecture (lpia). While I find lpia to be interesting technology and look forward to using it in the future, I don't yet find it suitable for everyday use. If you have questions about your pre-installed version of Ubuntu, you can look for answers on Dell's website or try posting the question in our Mini 9 Google Group.

This blog is about installing a running Ubuntu i386 architecture on your Mini. There are tutorials on how to create a LiveUSB stick, partitioning and installing Ubuntu, setting up Ubuntu Netbook Remix, enabling media playback, customizing Firefox for netbooks and much more. Please read the Ubuntu 8.10 Intrepid Ibex on the Dell Mini 9 overview article for info on installing Ubuntu on your Mini 9. Once you've decided on try Ubuntu, the Ubuntu User guides will help you get everything setup and customized.

Ubuntu is an amazing operating system but it is not magic, it doesn't just work. It requires a commitment to learning a different way of doing things. Problems will come up and it is important to remember Linux not Windows or OSX. The articles cover the major hardware problems that come up during installation, the comment sections offer insight on where other users have had problems. We also have a Google Group with over 150 users who are great about helping out. Besides my blog and the Google group, The Official Ubuntu Forums have millions of users and articles that can walk you through many software problems.

Welcome!
-redDEAD

Have a question or problem that this article doesn't cover?
Ask our Ubuntu Mini 9 Google Group for help.

Friday, December 19, 2008

Speed Up Your System and Save Your Hard Drive: Disable Tracker

Tracker is a tool designed to extract information and metadata about your personal files so that it can be searched easily and quickly. When using Tracker, you no longer have to remember where you've left your files. To locate a file you only need to remember something about it, such as a word in the document or the artist of the song. Traditional searching, by name and location, is also supported.

Tracker is turned on in Ubuntu by default. I personally turn it off because it uses up system resources that I don't want to spare and I don't keep a lot of data on my Mini. Other users have concerns with Tracker's wear and tear on their system drives. The Mini 9 ships with a solid-state hard drive that has a finite number of erase/write cycles that the flash memory can tolerate. There are also users who disable Tracker because they feel it is not a very good indexing program.

While I don't need an indexing program on my Mini, I have been testing Tracker on my desktop. I find that it works well.

But whatever your reason, disabling Tracker is easy.


To Stop Tracker From Loading on Start Up:
Under System>Preferences>Sessions
Screenshot-Sessions Preferences
Uncheck both Tracker and Tracker Applet

To Disable Indexing:
Under System>Preferences>Search and Indexing
Screenshot-Tracker Preferences
Uncheck both enable indexing and enable watching

Changes will take effect next time you restart your PC.

Remove Tracker
If you prefer you can chose to remove Tracker from your system:
In a terminal type
sudo apt-get remove tracker tracker-search-tool tracker-utils

For more information about solid-state hard drives.

Have a question or problem that this article doesn't cover?
Ask our Ubuntu Mini 9 Google Group for help.

Tuesday, December 16, 2008

Reboot or Shutdown Ubuntu Safely When Your System Freezes

Just like any operating system, Ubuntu can freeze up and crash. This does not mean there is something wrong with your system, it just happens. You just need to safely reboot or shut down your machine, in attempt to keep data loss or damage to a minimum.

To safely reboot or shut down Linux when your system freezes use the magic SysRq keys. The magic SysRq keys are a key combination which allows you to perform various low level commands regardless of the system's state. This should prevent a fsck from being required on reboot; it also gives some programs a chance to save emergency backups of unsaved work. You should never just cut the power or remove the battery when your system freezes, these actions can cause unnecessary data loss or the file system to become corrupted.

On most Linux system as well as when using Ubuntu the magic SysRq keys are the Alt and PrintScreen keys. When your system stalls first give your Mini 9 a second to catch up, remember it's a sub $400 netbook and not a super computer. If your computer is frozen and you are unable to regain control of the system:

1. Hold down the Alt and Printscreen keys
2. Enter these keys: R E I S U B, you do not need to capitalize the letters and shift should not be held down
3. The keystrokes should be entered a few seconds apart, 2-4 seconds, allowing for each process to end before starting the next.

REISUB allows you to:
R - unRaw (take control of keyboard back from X),
E - tErminate (send SIGTERM to all processes, allowing them to terminate gracefully),
I - kIll (send SIGKILL to all processes, forcing them to terminate immediately),
S - Sync (flush data to disk),
U- Unmount (remount all filesystems read-only),
B - reBoot.

You can replace B with O to shutdown the system.

This article was researched using the Magic SysRq Wikipedia page.

Have a question or problem that this article doesn't cover?
Ask our Ubuntu Mini 9 Google Group for help.

Saturday, December 13, 2008

Change Your User Password

A member of our Ubuntu Mini 9 Google group, thawk, posted asking how to change his user password in Ubuntu. I didn't know, so I checked Ubuntu's Official Documentation, Ubuntu's Community Documentation and Google search. None of them offered much help, I only found complex solutions. Thankfully another Google group member, Ronald Schouten, was able to point me in the right direction. Hopefully other Ubuntu users will find this helpful.

First Go to System>Preferences>About Me
Screenshot


This will bring up the About User Menu, select Change Password in the upper right corner of the window.
Screenshot-About User


Enter your old password and click the Authenticate button.
Screenshot-Change password


Enter your new password twice and select Change password.
Screenshot-Change password-2

Have a question or problem that this article doesn't cover?
Ask our Ubuntu Mini 9 Google Group for help.

Friday, November 28, 2008

Upgrading Your Mini 9's RAM Guide

It's no secret that the Dell Mini 9's maximum RAM size is 2GB. Dell purposely configured the Mini with a maximum of 1GB of RAM so that they could ship it with Windows XP.

In order for an OEM to buy a Windows XP license from Microsoft, their computer's specifications have to be below a predetermined minimum. If the Mini shipped with 2GB of RAM it would have been above the minimum and customers would be forced to buy Vista.

I can understand how this is beneficial to Windows users. I would prefer to run Windows XP over Vista on my Mini. Windows XP runs faster, takes up much less disc space, and is more memory and power efficient.

This memory limit doesn't make sense for Linux Users. We were only offered an upgrade to a maximum of 1GB so the Windows users could get their Mini's with XP. I'm not angry because it is an easy upgrade that anyone can do. It's also much cheaper for you to upgrade the RAM yourself.

WARNING: For users still running Dell's custom Mini OS based on Ubuntu 8.04, Dell modified the kernel and limited the maximum amount of RAM that Mini OS will see/use. If you want to upgrade your RAM over 1GB you will have to recompile your kernel or install a non-Dell version of Ubuntu. You can download Ubuntu here and use Ubuntu Mini's install guides to help you get everything up and running.


1. What You'll Need
01-tools
1- Unplug your Mini 9
2- Phillips Head Screw Driver
3- Groundind/Static Bracelet
4- 200pin DDR2800 (PC6400) RAM
5- Remember to read the instructions first.


2. Remove The Battery
03-remove_battery
Slide the battery locks outward and pull the battery out.
You do not want electrical current running through your Mini while upgrading.


3. Unscrew and Remove the Back Plate
04-unscrew_backplate
Remove the two philips head (crosshead) screws highlighted in the red boxes.


4. Remove The Old RAM
05-mini_guts
Gently push the silver headed white tabs on the side of the RAM DIMM outward to release the RAM. This should cause it to slightly angle outward.

06-angle_up
Gently pull the RAM out from the DIMM slot. It should release easily.


5. Install the New RAM
07-line_up
Line up the notch on the RAM to the notch in the DIMM slot (where is says REV).
Push the RAM into place at a 15 degree angle.
Once RAM is correctly aligned and fully inserted gently press down to lock it into place.

08-final


6. Replace The Back Cover & Screws
02-back_of_mini


7. Check Your RAM
In a termianal type:
head /proc/meminfo
Screenshot-red@red-mini: ~

Have a question or problem that this article doesn't cover?
Ask our Ubuntu Mini 9 Google Group for help.

Tuesday, November 25, 2008

Stop Compiz-Fusion From Loading Automatically

You do not want to run Compiz and Netbook Remix at the same time.

Compiz is the default window manager when you install Ubuntu. This guide will show you how to stop Compiz-Fusion from loading automatically on startup and make Metacity your default window manager.

Step 1: Run gconf-edit
Start Run Application by pressing Alt+F2

Screenshot-Run Application

Enter gconf-editor into the box, hit enter


Step 2: Set Metacity as your default start up window manager
Once in gconf-editor navigate to desktop>gnome>applications>window_manager
Screenshot-Configuration Editor - window_manager

under default replace:
/usr/bin/compiz with /usr/bin/metacity

it should like this when you're done:
Screenshot-Configuration Editor - window_manager
*If you see /usr/bin/metacity after you navigate gconf-editor, don't worry. Compiz wasn't loading automatically and you don't have to do anything else.

Have a question or problem that this article doesn't cover?
Ask our Ubuntu Mini 9 Google Group for help.

Friday, November 21, 2008

Customizing Firefox for Netbooks

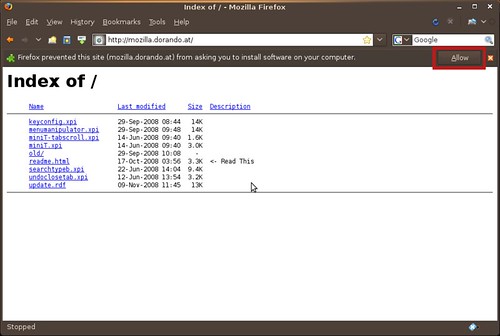
To access Firefox's Configuration File
Type about:config into the URL address bar
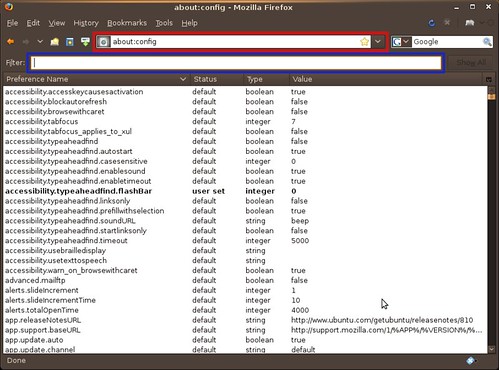
Screenshot-about:config - Mozilla Firefox
The red lines highlight the url box.
The blue lines highlight the filter box.
The filter box allows you to search your about:config file and is where you type the blue text commands.


Make Firefox Run Faster:
Enable Pipelining
Normally the browser will make one request to a web page at a time. When you enable pipelining, it will make several attempts at once, which really speeds up page loading. It's not very nice to slam websites with multiple requests. Be a good person and limit yourself to a reasonable number.
Set network.http.pipelining to true
Set network.http.proxy.pipelining to true
Set network.http.pipelining.maxrequests to 15
Right-click anywhere inside Firefox and select New-> Integer
Name it nglayout.initialpaint.delay and set its value to 0 (zero)

Stop Firefox from Loading Pages in the Background
Firefox downloads webpages from links it thinks you may click. This may make the experience seem faster but really it just bogs down Firefox and your netbook.
Set network.prefetch-next to false

Customize Backspace Button
The Ubuntu default is set to scroll up when the backspace button is pressed.
I prefer for it to go back in my page history.
Set browser.backspace_action to either 0 or 1
0 - Pressing backspace button will go back a page in the session history
1 - Pressing backspace button will scroll up a page in the current document and
[Shift]+[Backspace] will scroll down.

Enable Auto Scrolling & Smooth Scrolling
Go to Edit->Preferences and click Advanced.
Check the auto scrolling and smooth scrolling boxes to enable the middle click/touch pad to scroll smoothly left, right, up and down web pages.
Screenshot-Firefox Preferences


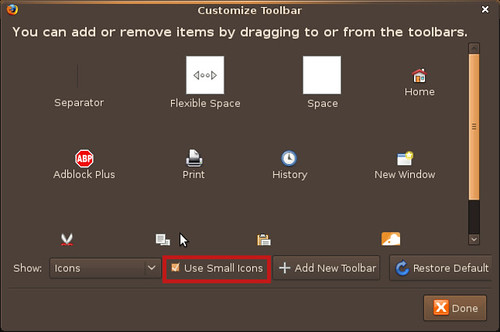
Free Up Screen Space:
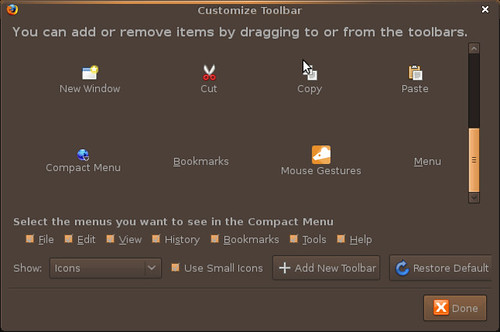
Use Small Icons
Right click an empty space on the Menubar , Navigational Toolbar or Bookmark Toolbar and select Customize. Check the Use Small Icons box.
Screenshot-Customize Toolbar

Remove the the Bookmark Toolbar
Right click an empty space on the Menubar , Navigational Toolbar or Bookmark Toolbar and uncheck the the Bookmark Toolbar box.
Screenshot-Ubuntu on the Dell Inspiron Mini 9: Ubuntu 8.10 Intrepid Ibex on the Dell Mini 9 - Mozilla Firefox

Remap the Fullscreen Shortcut
If your netbook shipped without an F11 key, like my Dell Mini 9, use this guide to remap maximize to another key.

More screen saving tips can be found in the plugins section below


My Favorite Firefox Plugins for Netbooks:
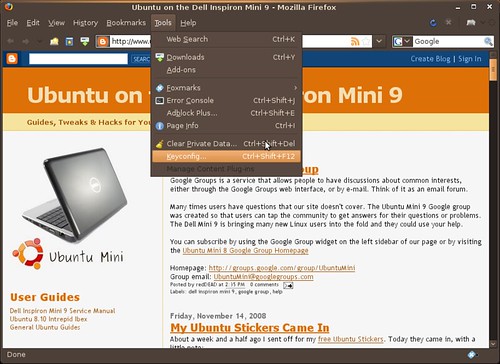
Foxmarks Bookmark Synchronizer
If you use Firefox on more than one computer, you'll want Foxmarks. Install Foxmarks on each computer, and it will work silently in the background to keep your bookmarks synchronized. You can also log in to my.foxmarks.com to manage your bookmarks from any computer.
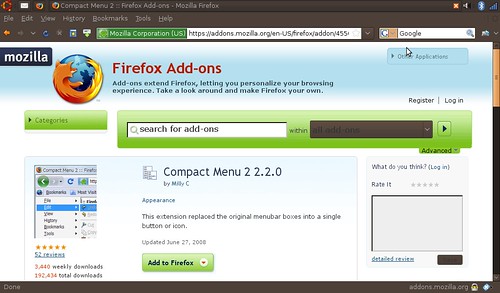
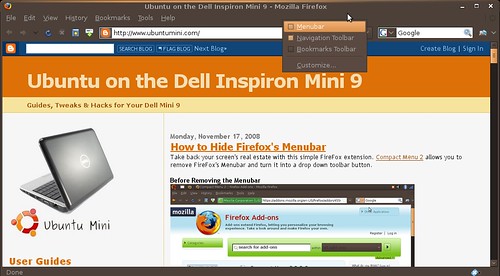
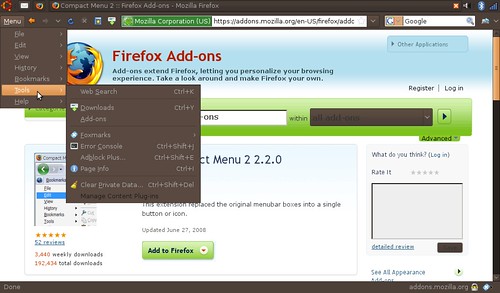
Compact Menu 2
Compact Menu 2 allows you to remove Firefox's Menubar and turn it into a drop down toolbar button. Another great plugin that allows you to save screen space.
My install guide can be found here.

Hide Tab Bar
Enables you to hide the tab bar. Another way to keep your screen clear of clutter.

Adblock Plus
Once installed, it's a snap to filter elements at their source-address.
Just right-click: Adblock. Filters use either the wildcard character or full Regular Expression syntax. Hit the status-element and see what has or hasn't been blocked. This plugin is important because loading ads slows down your netbook and takes up screen space.

Adblock Plus: Element Hiding Helper
This is a companion extension to Adblock or Adblock Plus and should be used in conjunction with it. This extension automatically downloads the latest version of Filterset.G every 4-7 days. Filterset.G is an excellent set of filters maintained by G for Adblock that blocks most ads on the internet. In addition, this extension allows you to define your own set of filters that you can add along with Filterset.G during an update. To report missed ads or problems with the extension visit the support forums

Flash Block
Flashblock is an extension for the Mozilla, Firefox, and Netscape browsers that takes a pessimistic approach to dealing with Macromedia Flash content on a webpage and blocks ALL Flash content from loading. It then leaves place-holders on the webpage that allow you to click to download and then view the Flash content. This one is key, I don't want flash objects loading and making noise when I'm mobile/in a meeting. Flashblock speeds up Firefox by not downloading videos you don't plan on watching.

NoScript
Winner of the "2006 PC World World Class Award", this tool provides extra protection to your Firefox. It allows JavaScript, Java and other executable content to run only from trusted domains of your choice, e.g. your home-banking web site, guarding your "trust boundaries" against cross-site scripting attacks (XSS) and Clickjacking attempts, thanks to its unique ClearClick technology. Such a preemptive approach prevents exploitation of security vulnerabilities (known and even unknown!) with no loss of functionality. I really love the speed increase this gives me.

Mouse Gestures Redox
Allows you to execute common commands (like page forward/backward, close tab, new tab) by mouse gestures drawn over the current webpage, without reaching for the toolbar or the keyboard.

GreaseMonkey
Allows you to customize the way a webpage displays using small bits of JavaScript. Hundreds of scripts, for a wide variety of popular sites, are already available at http://userscripts.org. You can write your own scripts, too. Check out http://wiki.greasespot.net/ to get started. This extension does some amazing things, check out for more at http://userscripts.org

Undo Closed Tabs Button
Tired of going to History -> Recently Closed Tabs just to undo a closed tab? Then this extension is for you! This extension allows you to undo closed tabs via a toolbar and/or tab bar button or the right-click context menu.

Custom Download Manager
This addon allows you to personalize your download manager. Now, you can open the download manager on a new tab or on the sidebar. You don't need a popup download manager cluttering your screen.

Tabs Open Relative
Tabs Open Relative makes all new tabs open to the right of the current tab, rather than at the far right of the tab bar. I don't know how I used tabs before this plugin came along.

Open Image In New Tab
Adds right-click context menu item for opening images in new tabs.

Context Search
Expands the context menu's 'Search for' item into a list of installed search engines. Hold Ctrl or middle-click to open results in a new tab, Shift to open a new window.

LittleFox
LittleFox, designed for optimal screen usage, leaving lots of room for browsing. For Firefox 2.0 and 3.0. Includes support for Personas, Forecastfox, Tabbrowser Preferences, Fusion, ReloadEvery, Stumbleupon, Gmail, Basics, Calendar, and many more. I don't use it. LittleFox does do a lot of the screen saving tweaks without having to do any of the work. Perfect for lazy readers.

Digg This Article
digg_64

Have a question or problem that this article doesn't cover?
Ask our Ubuntu Mini 9 Google Group for help.

Tuesday, November 18, 2008

Remap Firefox's Fullscreen Shortcut

The Dell Mini 9 ships without an F11 key, so using F11 to maximize Firefox is impossible.
But we can remap maximize to another key.
First download the keyconfig for Firefox 3 plugin. Firefox will prevent the plugin from installing, allow it to install.
Screenshot-Index of - - Mozilla Firefox
Screenshot-Software Installation

Restart Firefox and then go to Tools>Keyconfig
Screenshot-Ubuntu on the Dell Inspiron Mini 9 - Mozilla Firefox

This will bring up the Keyconfig menu.
Screenshot-Keyconfig
From here you can scroll down to the Full Screen [View] shortcut and remap to whatever key you want.

I disabled Help Contents [Help] (I never have and probably never will use it) and remapped Full Screen to F1.

Have a question or problem that this article doesn't cover?
Ask our Ubuntu Mini 9 Google Group for help.

How to Hide Firefox's Menubar

Take back your screen's real estate with this simple FireFox extension. Compact Menu 2 allows you to remove FireFox's Menubar and turn it into a drop down toolbar button.

Before Removing the Menubar
with_menu

Once you Install Compact Menu 2 allow Firefox to restart.
Screenshot-Ubuntu on the Dell Inspiron Mini 9 - Mozilla Firefox
Now right click a blank area in Firefox's Menubar, Navigational Toolbar or Bookmark Toolbar.
Unselect Menubar to remove Firefox's Menubar.

Once the Menubar has been removed, right click a blank area in the Navigational Toolbar or Bookmark Toolbar and select Customize.
Screenshot-Customize Toolbar
Place the Menu drop down toolbar button on the Navigational Bar.

After Removing the Menubar
(with the menu toolbar button expanded)
menu_demo

With the Dell Mini 9's limited screen resolution, it is important to maximize every pixel of screen space. By using Netbook Remix's Maximus and Compact Menu 2, I can remove all unnecessary parts from FireFox and do more faster.

Have a question or problem that this article doesn't cover?
Ask our Ubuntu Mini 9 Google Group for help.

Sunday, November 16, 2008

We've Got a Google Group

Google Groups is a service that allows people to have discussions about common interests, either through the Google Groups web interface, or by e-mail. Think of it as an email forum.

Many times users have questions that our site doesn't cover. The Ubuntu Mini 9 Google group was created so that users can tap the community to get answers for their questions or problems. The Dell Mini 9 is bringing many new Linux users into the fold and they could use your help.

You can subscribe by using the Google Group widget on the left sidebar of our page or by visiting the Ubuntu Mini 9 Google Group Homepage

Homepage: http://groups.google.com/group/UbuntuMini
Group email: UbuntuMini@googlegroups.com

Have a question or problem that this article doesn't cover?
Ask our Ubuntu Mini 9 Google Group for help.

Friday, November 14, 2008

My Ubuntu Stickers Came In

About a week and a half ago I sent off for my free Ubuntu Stickers. Today they came in, with a little note:

Enclosed are the 'Powered by Ubuntu" sticker you requested.

With the incredible success of Ubuntu around the world, the LoCo project is here to help groups of Ubuntu fans and enthusiasts work together in regional teams to help advocate, promote, translate, develop and otherwise improve Ubuntu.

Join or start an Ubuntu Local Community Team at http://wiki.ubuntu.com/LoCo


IMG_0018

IMG_0019


IMG_0023

I never mention how cool local Ubuntu Community groups are. Their hard work and dedication help make Ubuntu what it is. Thanks!

Have a question or problem that this article doesn't cover?
Ask our Ubuntu Mini 9 Google Group for help.