Showing posts with label synaptic. Show all posts

Wednesday, September 16, 2009

Configure Synaptic Touchpad

This is partially a howto and mostly an informational guide on how to get the most out of your touchpad.

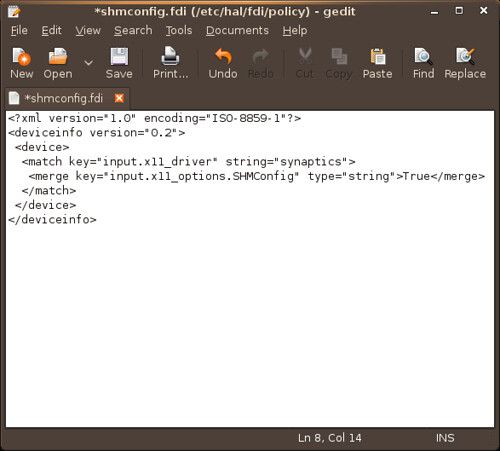
You used to be able to configure your mouse/touchpad settings in Ubuntu by editing your xorg.conf file. With Ubuntu 9.10 there will no longer be an xorg file to edit. The input driver has moved from xorg to hal and you have to edit an fdi file to properly configure your touchpad.

1. Enable SMHconfig
* Note: This method is not secure if you are in an untrusted multiuser environment. All local users can change the parameters at any time.

In a terminal type:
sudo gedit /etc/hal/fdi/policy/shmconfig.fdi
- Then copy this text into that file.
shmconfig
- Log Out/Reboot for the settings to take effect

2. Display Your Current Settings
In a terminal type:
syndaemon -d && synclient -l
- This will show you what your current/default settings are. Copy them into a blank file. You will use this a reference point.

In a termianl type:
synclient -m 10
- This will show, in real time, the output of your touchpad. Another tool to use as reference for editing your file.

3. Create An .fdi File
In a terminal type:
sudo mkdir /etc/hal/fdi/policy/10osvendor/
- This will make a folder for the 11-x11-synaptics.fdi file

In a terminal type:
sudo gedit /etc/hal/fdi/policy/10osvendor/11-x11-synaptics.fdi
- Creates a black configuration file.
- Download my 11-x11-synaptics.fdi templete
- Copy and paste the contents into your 11-x11-synaptics.fdi file.
- You can opt to use this file for your touchpad settings; it has vertical/horizontal scroll and emulated middle click enabled.

5. Edit the 11-x11-synaptics.fdi File
- It is written in Extensible Markup Language (xml)
- You can read the the synaptic manual here or output into a terminal with:
man synaptics
- The Synaptic manual will define the terms included within the .fdi file.
- Template follows the output of syndaemon -d && synclient -l and it is intelligently laid out by function.
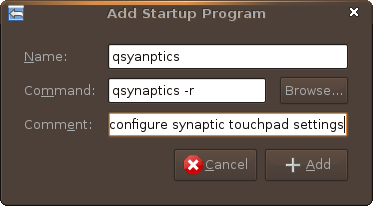
- You must log out or restart HAL for the settings to take effect.
To restart HAL in a terminal type:
sudo /etc/init.d/hal restart
- restarting HAL theoretically should work but i did not work for me. I had to log in and out.

Have a question or problem that this article doesn't cover?
Ask our Ubuntu Mini 9 Google Group for help.

Wednesday, November 12, 2008

Configure Synaptics Touchpad Ubuntu 8.10

There are a few ways to configure you synaptic touchpag settings in Ubuntu 8.10

The first was sent to us by JewHouse
It involves no configuration, just the installation of a .deb. The only drawback is that TouchFreeze only allows you to customize the touchpad delay when typing.

In a terminal type:
sudo apt-get install touchfreeze

You can then find TouchFreeze in Applications > Accessories
Screenshot

TouchFreeze then loads in your notification area and you can double click the icon to configure it
Screenshot-1


The second involves enabling SHMConfig, I found the howto on the Ubuntu Community Documents Pages.

Note: This method is not secure if you are in a n untrusted multiuser environment. All local users can change the parameters at any time.

In a terminal type:
sudo gedit /etc/hal/fdi/policy/shmconfig.fdi

Then add this to the blank file you just created:
Blogger wouldn't display it properly, so to copy the text click here
Screenshot-*shmconfig.fdi (-etc-hal-fdi-policy) - gedit

Save the file and then reboot
To reboot in a terminal type:
sudo reboot

Now that you have enabled SHMConfig you can use qsynpatics or gsynaptics to configure your touchpad and configure more than just a typing delay. I prefer qsynaptics.


To install the .deb for your version of qsyanptics (most will need the i386 version) click here
qsynaptics .debs for other architecture

To run qsyanptics, type the command qsyanptics in a terminal or in a Run Application Box (press Alt and F2).
Screenshot-Run Application


To make the setting load when you login:
Go to System > Preferences > Sessions, add a new command
Screenshot-Add Startup Program
qsynaptics -r


To install gsynaptics in a terminal type:
sudo apt-get install gsynaptics

You can find gsynaptics in System > Preferences
gsynaptics

Screenshot-Touchpad Preferences
Have a question or problem that this article doesn't cover?
Ask our Ubuntu Mini 9 Google Group for help.