Thursday, April 30, 2009

Desktop-Swticher is Kind of Broken

Desktop-Switcher is an application that allows you to switch between Ubuntu Netbook Remix's clutter launcher interface and the standard Ubuntu Gnome desktop. Many readers are complaining that they are losing Metacity (window borders) and the Gnome Panel when switching between the desktops.

This fix comes straight from the Ubuntu Remix Developer:
Run one of the following commands depending on your desktop environment via the terminal:

From the Ubuntu Netbook Dekstop:
gconftool-2 --set /desktop/gnome/session/required_components_list --type list --list-type=string ["windowmanager","panel"]

From the Classic Desktop:
gconftool-2 --set /desktop/gnome/session/required_components_list --type list --list-type=string ["windowmanager","panel","filemanager"]

There is also a i386 .deb (sorry lpia users) attached to the bug tracking thread that should fix the desktop-switcher errors
Download it here

Getting to the Terminal
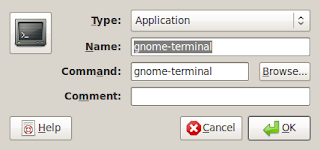
Right click the desktop and select Create Launcher...


- Use the command gnome-terminal

-----
Below I'm leaving my not so elegant fix to the solution. Mainly as a reminder of I don't always have the right answer.

- Reboot your PC.
- Using the terminal reboot your Mini 9 using the command: sudo reboot
- Select the Failsafe Terminal Session at the Ubuntu Gnome Display Manager (gdm) login screen.
- After loading into the Failsafe Terminal session, use the command: sudo nautilus
to launch a gnome file manager. Go into your /home folder and after turning on hidden files (ctrl+H) delete the following folders: .gconf, .gconfd and .gnome2
- Reboot your machine.
- Now your panels and window borders will be back.

I then used my Stop Compiz-Fusion From Loading Automatically guide to remove Compiz as my default window manager. Rebooted my machine and then was able to safely switch between desktops using UNR's dekstop-switcher.

Have a question or problem that this article doesn't cover?
Ask our Ubuntu Mini 9 Google Group for help.

Sunday, April 26, 2009

Skype on The Dell Mini 9

Get Skype
You can download Skype for Linux directly from the Skype website or install it from the Medibuntu repository. I prefer and recommend, downloading it from Medibuntu. They have packaged Skype specifically for the newest versions of Ubuntu in both the i386 and lpia architectures. To install the Medibuntu repository follow the guide for yor specific version of Ubuntu, 8.10 or 9.04.

To install Skype after setting up the Medibuntu Repository,
In a terminal type:
sudo apt-get install skype

Configuring The Dell Mini 9's Audio
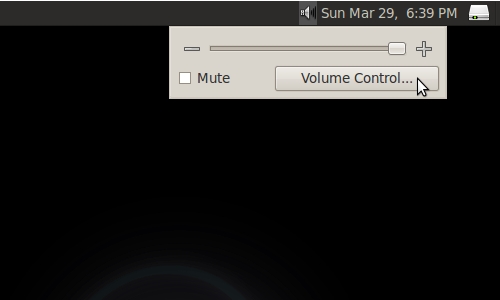
Left click the volume control icon on the gnome panel and click the Volume Control... button.
left_click_volume

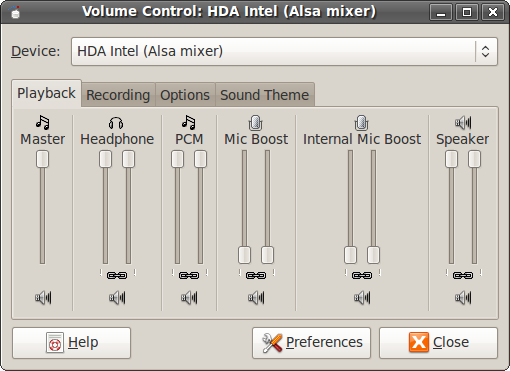
This will bring up the HDA Intel (Alsa mixer) Volume Control Panel:
HDA Intel (Alsa mixer) Playback Tab
- Select Preferences

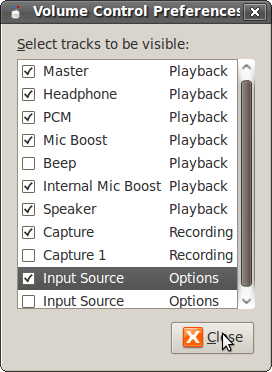
This will bring up the Volume Control Preferences
Volume COntrol Preferences
Make sure the:
- Master
- Internal Mic Boost
- Capture
- Input Boxes
are checked, then close the dialogue box

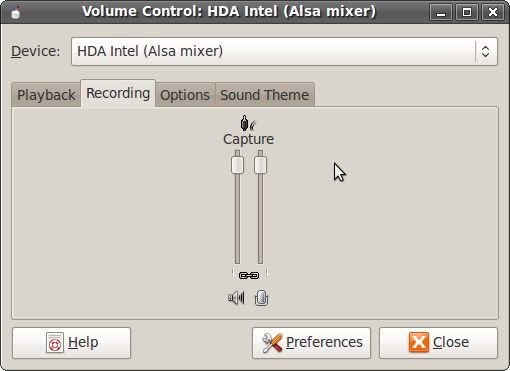
Go to the Recording Tab
HDA Intel (Alsa mixer) Recording Tab
- Turn your capture slider up and make sure the mic icon on the bottom of the dialogue box is not X'ed out. It is not necessary to turn the volume completely up, if you experiencing a lot of static or feedback try turning the volume down.

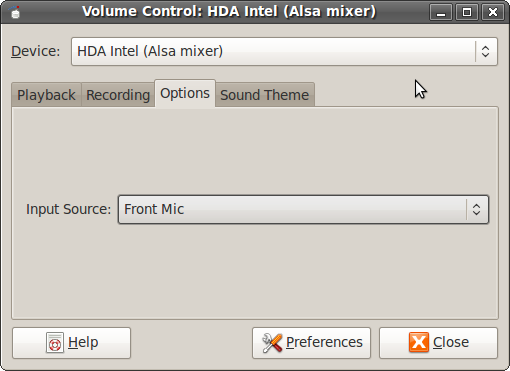
Go to the Options tab
HDA Intel (Alsa mixer) Options Tab
-Set yor Input Source to the Front Mic

Configuring Audio In Skype
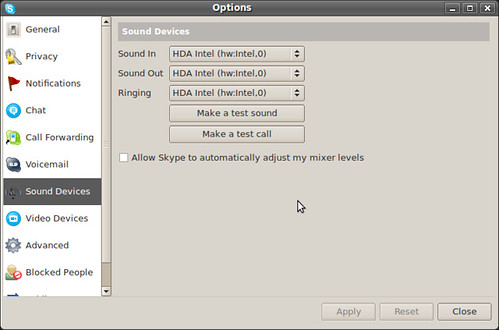
Go to the Options menu, under Sound Devices
Skype Sound Settings
Set:
- Sound In to HDA Intel (hw:Intel,0)
- Sound Out to HDA Intel (hw:Intel,0)
- Ringing to HDA Intel (hw:Intel,0)
Then:
- Uncheck the box that says "Allow Skype" to automatically adjust your mixer levels.
- Apply the settings


To Setup Video In Skype
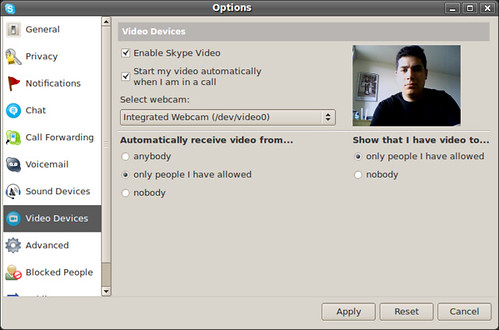
Go to the Options menu, under Video Drivers
Skype video settings
- Check the Enable Skype Video
- Check the Start my video automatically when I am in a call box.
- Select Integrated Webcam (/dev/video0)
Apply the settings.

Skype will now work with the Mini's internal mic and speakers. Configuring other devices to work with Skype is up to you. I haven't had much luck with my PS3 Bluetooth headset.

Have a question or problem that this article doesn't cover?
Ask our Ubuntu Mini 9 Google Group for help.

Sunday, April 19, 2009

User Guides for Ubuntu 9.04 Jaunty Jackalope

Everything you need to get Ubuntu 9.04 up and running on your Dell Mini 9

An overview of Ubuntu 9.04 on the Dell Mini 9

Creating a LiveUSB Stick

Creating a LiveUSB stick using an .img file

Installing Ubuntu on the Dell Mini

Installing Ubuntu Netbook Remix

Enabling sound after installing Ubuntu 9.04

Installing Aircraft Manager, for turning Bluetooth and WiFi on and off

Stop Compiz-Fusion From Loading Automatically, necessary for running Ubuntu Netbook Remix and using desktop-switcher

Fixing The Desktop After Using Desktop-Switcher Applet, this guide will walk your through the steps of getting your gnome panel and windows back after using desktop switcher

Customizing Firefox for Netbooks, necessary for using Firefox on a small netbook screen

Installing media codecs, for playing mp3, DVD, avi, mp4, aac, etc

Installing Medibuntu, for encrypted DVD playback, Windows codecs and Microsoft fonts

Installing and Configuring Skype on the Dell Mini 9

Have a question or problem that this article doesn't cover?
Ask our Ubuntu Mini 9 Google Group for help.

Saturday, April 18, 2009

Aircraft Manager for Ubuntu 9.04

Aircraft Manager is a program for turning Bluetooth and WiFi off and on. By turning off these services when not in use, you can help extend the life of your battery charge considerably.

Dell released a version of Aircraft Manager when the Mini was first shipped that worked for Ubuntu 8.04 and 8.10.Unfortunately that version does not work in Ubuntu 9.04 Jaunty Jackalope. I tried to email the maintainer for the aircraft manager package but never received a response. I thought Aircraft Manager was dead for Ubuntu 9.04 until one of the Ubuntu Mini 9 Google group members Jitender decided to fix the problem himself and repackage Aircraft Manager to work in Ubuntu 9.04. You can read the thread here.

You can find the Aircraft Manager Packages in Jitender's Launchpad Personal Package Archives (PPA)

But if you're having trouble adding the key and PPA to your source list you can download the .debs through he direct links provided. Make sure you install the correct version for your system.
- For standard 32-bit installs
aircraft-manager_12.1_i386.deb
- For Low Power Intel Architecture (if you installed the Ubuntu MID)
aircraft-manager_12.1_lpia.deb


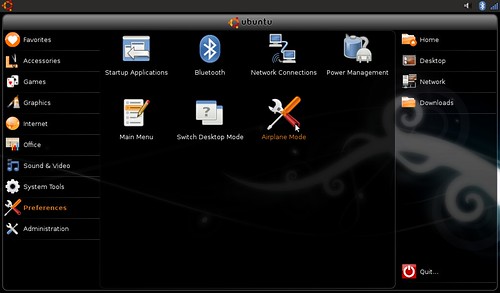
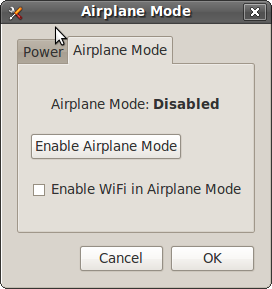
Once installed, you can find Aircraft Manager in System>Preferences, under the title Airplane Mode
airplane mode menu

It allows you to turn off WiFi (wireless), Bluetooth, or both
wifi and bluetooth toogles

And you can also put the Mini into Airplane Mode for safe usage while flying
Airplane Mode checkbox
Since someone asked:
The reason flights ban laptops is that they emit radio waves. All wireless devices do, and the navigation and flight control computers on airplanes are designed to sense even very weak signals coming from far away. Radio waves with just the right power and frequency can, in theory, introduce errors in computing equipment.

Have a question or problem that this article doesn't cover?
Ask our Ubuntu Mini 9 Google Group for help.

Saturday, April 11, 2009

Ubuntu Podcast

Mark Shuttleworth, the founder of Ubuntu, joins the guys at http://ubuntupodcast.net/ for a video podcast to discuss the upcoming 9.04 release, Ubuntu history, Linux on the desktop, impacts of cloud computing, Ayatana, the community and Ubuntu, Ubuntu and Canonical, Google Summer of Code, Ubunet, and more.


Ubuntu Podcasts and Videocasts brought to you by Georgia and Florida US LoCos. It is not an official Ubuntu podcast. The views and opinions expressed in the podcast are strictly those of the hosts and not Canonical or Ubuntu.

Have a question or problem that this article doesn't cover?
Ask our Ubuntu Mini 9 Google Group for help.

Friday, April 10, 2009

Medibuntu for Ubuntu 9.04

Medibuntu (Multimedia, Entertainment & Distractions In Ubuntu) is a repository of packages that cannot be included into the Ubuntu distribution for legal reasons like copyright, license or patent restrictions. It also includes many popular .debs for w32codes, Skype and Google earth in both i386 and lpia architectures.

Ubuntu 9.04 Jaunty Jackalope can not play encrypted DVDs or use certain Windows codecs out of the box. This guide will show you how to install the Medibuntu repository and these codecs.

Add the Medibuntu Repository
In a terminal type:
sudo wget http://www.medibuntu.org/sources.list.d/jaunty.list --output-document=/etc/apt/sources.list.d/medibuntu.list

Then you have to add the GPG Key to authenticate the packages and Update
In a terminal type:
sudo apt-get update && sudo apt-get install medibuntu-keyring && sudo apt-get update

You may be asked to accept this package even though it cannot be authenticated. This is normal; typing "Yes" means you trust Medibuntu.

Download the encrypted DVD playback codecs
In a terminal type:
sudo apt-get install libdvdcss2

Download the Window codecs
In a terminal type:
sudo apt-get install w32codecs

Download Skype
In a terminal type:
sudo apt-get install skype

Have a question or problem that this article doesn't cover?
Ask our Ubuntu Mini 9 Google Group for help.

Tuesday, April 7, 2009

Fix The Audio in Ubuntu 9.04 on the Dell Mini 9

After installing Ubnuntu 9.04 on your Dell Mini 9, you probably are not going to hear the familiar Ubuntu start-up sound or any sounds at all. Unlike Ubuntu 8.10 which required users to add a line to their alsa base-file to get sound working. Ubuntu 9.04 Jaunty Jackalope installs with sound enabled, it just that the speaker volume is turned completely down.

To fix this, left click on the volume applet in the upper right hand Gnome panel.
left_click_volume
-select Volume Control

Under the HDA Intel (Alsa Mixer)
Screenshot-Volume Control: HDA Intel (Alsa mixer)-1
Turn up the speaker volume (last entry to the right)

Now your sound will be able to be heard in Ubuntu 9.04 Jaunty Jackalope.

Have a question or problem that this article doesn't cover?
Ask our Ubuntu Mini 9 Google Group for help.

Friday, April 3, 2009

Installing Ubuntu Netbook Remix in Ubuntu 9.04/9.10

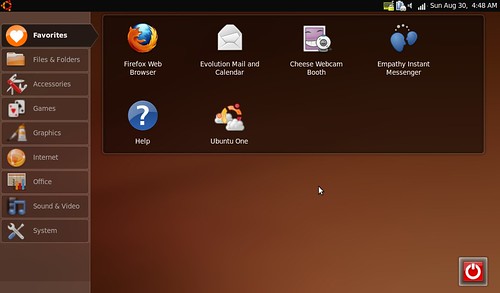
unr_favorites
- Ubuntu Netbook Remix 9.10

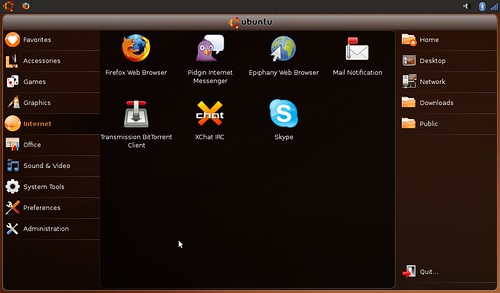
UNR 9.04
- Ubuntu Netbook Remix 9.04

Installing Ubuntu Netbook Remix in Ubuntu 9.04 and 9.10 is easy. Unlike Ubuntu 8.04 or 8.10, you do not have to add any extra repositories to install UNR or add programs to the Startup Applications to get it to work.

The UNR packages have been added to the official universe repository. The developers have also created a package, ubuntu-netbook-remix-default-settings, that configures and adds the necessary programs, netbook-launcher and maximus, to your start-up applications.

To install Ubuntu Nexbook Remix
In a terminal type:
sudo apt-get install ubuntu-netbook-remix

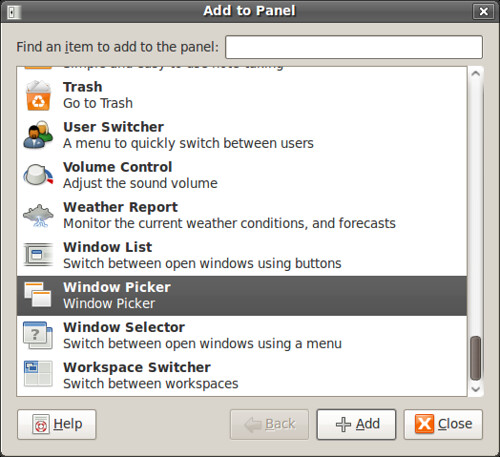
Once you have installed Ubuntu Netbook Remix, you can configure your panels to give it the UNR look and feel. To do this, right click the Gnome Panel and select "Add to panel".
UNR 9.04 Add to Panel
- Add the go-home-applet & window-picker-applet to the gnome panel.

UNR 9.04 window picker
- UNR with the go-home-applet and window-picker-applet running.

If you want to switch to the normal Ubuntu desktop you can use the desktop-switcher.

If you want to uninstall Ubuntu Netbook Remix
In a terminal type:
sudo apt-get remove ubuntu-netbook-remix

If you are getting an "E: Couldn't find package ubuntu-netbook-remix" error. Try updating your source list.
In a terminal type:
sudo apt-get update
Then try installing the Ubuntu Netbook Remix packages.

Have a question or problem that this article doesn't cover?
Ask our Ubuntu Mini 9 Google Group for help.