
Known Issues:
- The Broadcom wireless card driver does not install correctly on the Dell Mini 9/10v and Vostro A90.
- The Dell Vostro A90's audio does not work out of the box
1. Download Ubuntu 9.10
- I chose to install the standard 32bit Ubuntu Desktop Karmic .iso
- Ubuntu Netbook Remix is broken, and I would advise against it if you are installing Ubuntu 9.10
2. Prepare Your Install Media
- I prefer to use my external DVD drive but you can also use a LiveUSB stick to install Ubuntu. Follow these directions for creating a LiveUSB image and check our usb flash drive compatibility list for recommendations on drives.
3. Boot Into Your Install Media
- By default the Mini 9/10v and Vostro boot from the hard disk first, you need to tell the mini to boot into your install media.
- Boot your PC, when the Dell splash logo appears hit the zero (0) key to access your one time boot list. Use the DVD/CD drive option if installing from disc or the Removable Devices option for a LiveUSB install.
4. Installing Ubuntu 9.10 Karmic Koala
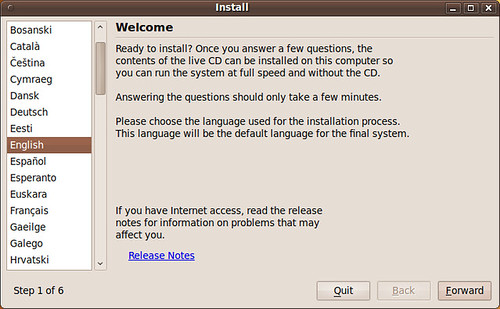
Step 1 - Choose Your Install Language
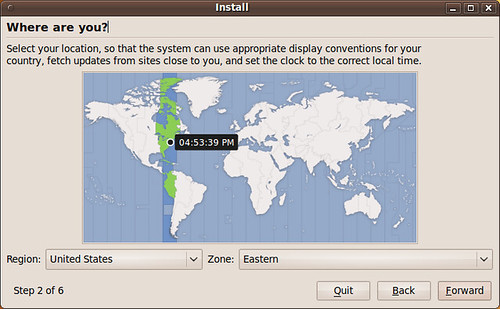
Step 2 - Choose Your Location
Step 3 - Choose Keyboard Layout

Step 4 - Partitioning the Disk
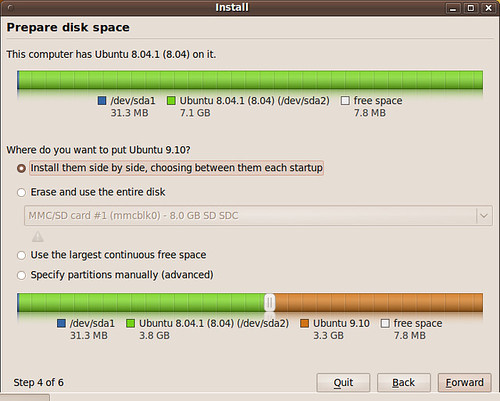
- There are three options for installing Ubuntu
- If you plan on dual booting you may want to choose the Install them side option. A slider will appear and allow you to resize your partitions. This method is recommended for users that are uncomfortable with manually partitioning their drives but want to dual boot. Make sure to defragment your Windows drive before you install Ubuntu so you don't lose data.
- Erase and use the entire disk is not recommended. If you plan on deleting the whole hard disk and not dual booting booting it is recommended that you partition the drive manual using the last option, it is easy and allows you to separate your /root and /home partitions. Doing this is great to protect against data loss if your install/upgrade goes bad later.
- Specify partitions manually is recommended and not hard. The rest of the install guide will focus on it. It is the best way to install Ubuntu on your Dell Mini/Vostro.

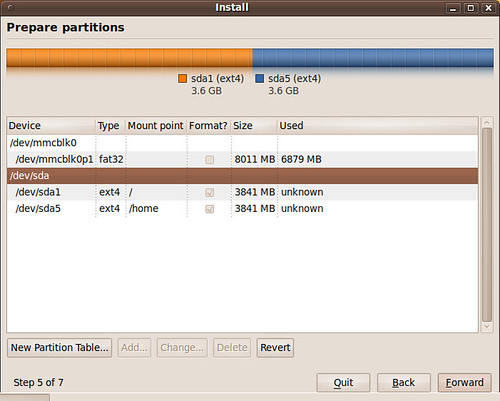
- Ignore the /dev/mmcblk0p1 in the picture, it is my SD card. I had it in while installing to save screenshots on.
- Your Mini/Vostro hard drive will be /dev/sda
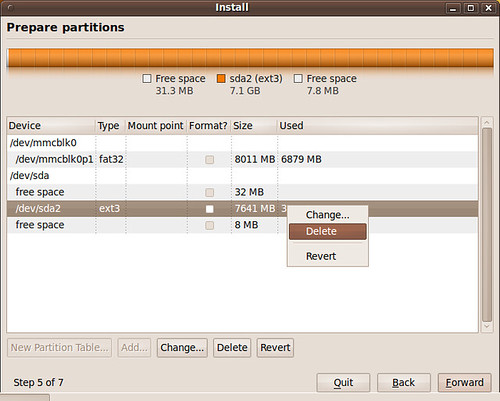
- Right click the partition to delete/resize it.
- Depending on your space you have some options/decisions.
- For this guide will will be preforming a clean install with a separate /root and home partition on a 8GB SSD.

- After freeing hard drive space for Ubuntu, right click your free space and select add to create a /root partition
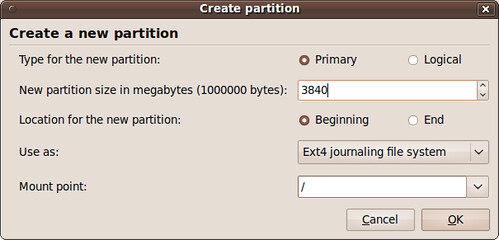
- Your /root should be at least 2GB but realistically closer to 4GB to avoid future problems. The root partition is where the operating system and programs are stored. I chose to use half the size of my 8GB drive for my /root partition but could have safely went as low as 2.5GB - 3GB.
- 1GB = 1024 megabytes
- The /root partition type should always be primary, start at the beginning and its mount point is /
- The file system selection is up to you, Ext4 is recommended and the fastest. Other users prefer Ext3 for its rock solid stability or Ext2 because it does not journal. Journaling protects against data corruption in the case of a power failure or system crash but it also writes more frequently to the solid state disk. Most users will want to Use Ext4, it is Ubuntu's default section.
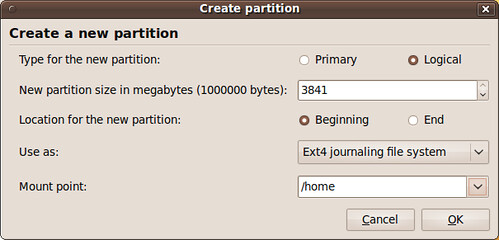
- Your Home folder will be the rest of your hard drive space. The home partition is where all your personal data and program settings are stored.
- The /home partition type is logical, should start at the beginning and its mount point is /home
- Again the file system selection is up to you, Ext4 is recommended.
- As you can see I split my 8GB drive in two, half for my operating system /root and half for my personal files and settings /home.
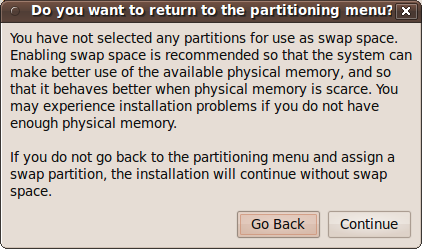
- After clicking forward you will see this pop message. This guide does not create a swap partition for Ubuntu. Swap is used by the operating system to store and retrieve data from secondary storage for use in main memory. It is not really need and if you don't have a large drive it is unnecessary.
- You can chose to go back and resize you partitions to create a swap partition. A 1GB swap partition is recommended, anything more would be overkill on a netbook.
- If you want to hibernate your Mini/Vostro you will need to create a swap partition.
Step 6 - Who Are You?
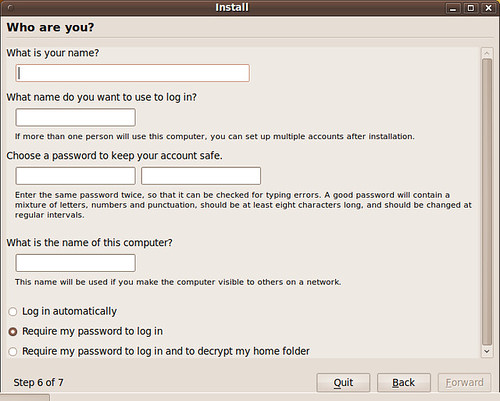
- Enter your information, user name and password.
- You can choose to encrypt your home folder. There is a slight performance hit if you choose to encrypt your home folder but it is negligible. I have two identical drives STEC SSD drives, one is encrypted and one unencrypted, I can not tell the difference between the two.
- Encryption is a good idea if you travel, are paranoid, or just don't want anyone accessing your files.
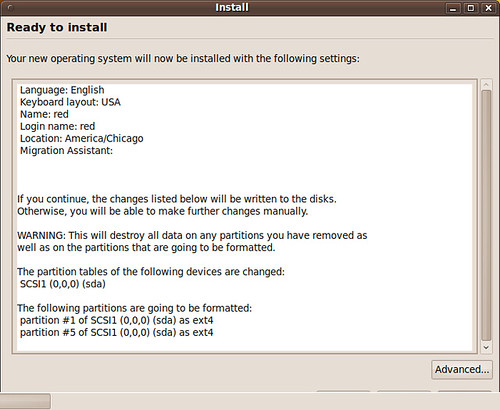
- This is the final check list before hitting install. Make sure everything is correct and begin the installation.
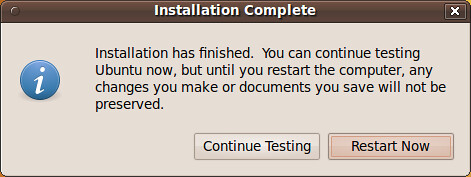
- Reboot the machine so we can fix the wireless card driver and the audio on the Vostro A90.
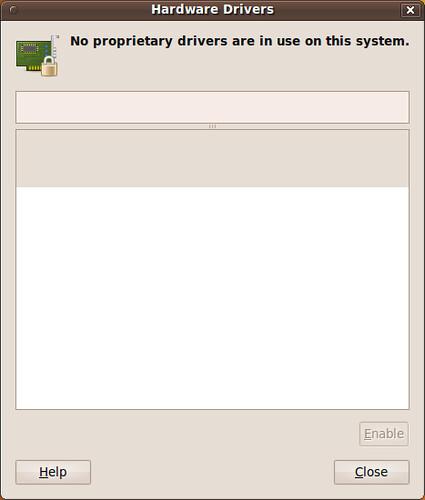
5. Install The Broadcom Wireless Card Driver
- Usually installing the proprietary Broadcom wireless driver in Ubuntu is handled with couple mouse clicks by the Hardware Drivers (aka jockey-gtk). But Karmic has shipped with a bug that makes jockey unable to recognize the card and install the driver.
- First connect to the internet via a wired connection.
- Then go to Synaptic Package Manager (System>Administration>Synaptic Package Manager)
- Click the Reload button in the upper left corner of Synaptic to refresh your repository index.
- Then reinstall the bcmwl-kernel-source package

- Click to enlarge
OR: after connecting to the internet via a wired connection in a terminal type:
sudo apt-get update
sudo apt-get --reinstall install bcmwl-kernel-source
sudo apt-get --reinstall install bcmwl-kernel-source
-reboot the machine, afterwards you will see the drive installed and working.

6. Fix the Audio on the Dell Vostro A90
- You need to add a line to your /etc/modprobe.d/alsa-base.conf file
- In a terminal type:
sudo gedit /etc/modprobe.d/alsa-base.conf
- then add this to the bottom of the alsa-base.conf file:options snd-hda-intel model=dell
- then reboot the machine for the changes to take effect.| Have a question or problem that this article doesn't cover? Ask our Ubuntu Mini 9 Google Group for help. |
18 comments:
I'd already installed Karmic, but I appreciate the effort you put into these guides for those experiencing difficulties in installing.
I have to say, it's a little unfair to call UNR "broken", since all of the UNR-specific features work just great. I'm actually a fan of the new interface, and I don't really do anything on my Mini 9 that requires or merits needing the standard gnome interface (though I am a rarity, apparently, for having a laptop and a desktop).
Wow lots of stuff posted here, good job.
Sadly, I think I might be staying in 9.04 and waiting for 10.04, because of all the regressions in 9.10. It would be nice to know if flash video performance is enhanced, that's really my only issue with 9.04.(really a flash problem I know) However, I downloaded Boxee, and surprisingly it can play Hulu videos full screen with very little choppiness.
kpprom
improved video performance is Karmics big feature. The intel driver plays back video much better and the flash has improved.
I have a full review of Karmic within a couple of days. There are things I do not like but overall I think its the best release so far.
i updated my Dell Mini 9 from 9.04 to 9.10 when it was fully released and had no such problems with the Broadcom driver- it recognized automatically. Maybe this is because I updated rather than clean-installed?
Also, I'm a huge fan of the Netbook Remix in 9.10 and find it works better on my Mini 9 than UNR 9.0.4 did ^_^
Does it help to update the drivers from "Dellbuntu" 8.04 before doing the 9.10 upgrade?
Tim,
No. All the drivers except the wireless are built into the kernel, which is going to be replaced. Upgrading them in 8.04 doesnt effect anything in Ubuntu 9.10.
Thanks for this great guide. Everything worked fine except for the wireless fix. When I check the Hardware drivers (after following your instructions), I see the driver listed in the bottom window. But it is not activated, and I'm still told that "No proprietary drivers are in use on this system." If I try to click "Activate," it claims to be "downloading and installing drivers" for a second, but then nothing changes, even after reboot. Any suggestions? Thanks!
acolapinto,
After connecting to the internet via a wired connection in a terminal type:
sudo apt-get purge --remove bcmwl-kernel-source bcmwl-modaliases
sudo apt-get update
sudo apt-get install bcmwl-modaliases bcmwl-kernel-source
sudo reboot
If this doesn't work our wifi might not be turned on. Turn it on in your BIOS or use aircraft manager to turn on wifi. The guide can be found on the site.
The problem solved itself somehow. I'm not sure what did the trick. But thanks for the suggestions, and for putting this site together.
Anyway to fix the wireless drivers without a wired connection? For some reason the wired connection isn't working for me either. I'm not sure that it's not a hardware issue as I've never used the wired ethernet port before. Wired may have never worked for me on my Dell Mini 9.
Thanks
Jay,
http://packages.ubuntu.com/karmic/bcmwl-kernel-source
The download link for the package.
Thanks for the advice. Both the bcmwl-kernel-source package and the dkms package (as it seemed to be required) were on the live iso. I installed from live on a usb stick with unetbootin and installed both bcmwl-kernel-source package and dkmswith "sudo dpkg -i packagename.deb" "Enable Networking" is checked on, but I've still got no network connections. Have I missed something obvious? Thanks again for the help.
I would make one note to this install: if you want to install a swap partition, it has to be as large as your RAM - so 2 gb of RAM requires a 2gb swap partition for hibernation. Using less created a small problem for me, but with partition resizing all is well. I am very grateful for this guide, though. Thanks so much!
The same method for installing the wireless driver works for the 10v with the alpha 3 version of Lucid Lynx (10.4). As far as I know, everything else is working out of the box other than Bluetooth (which I couldn't get to work with Karmic either).
is this style or information working on ubuntu v10 remix netbook edition on HP 110 mini ??? I update all about the driver ,but my laptop wireless still can't connect , even wireless network name also no out ... please help me ....
is it this step working on ubuntu v10 remix netbook edition on HP mini 110 ??? i update all my wireless driver , but it still no working , i aldy reboot it ... still the same result ... even the wireless network name also can't detect .... Please help me ...
I used this guide to install 10.10 on my Mini 9 - everything worked out great. The wireless card fix was spot on.
FYI I was able to download the 10.10 .iso and use the USB boot drive tool per the Ubuntu web site's instructions using a 1GB thumb drive.
hello chris..
can u tell me how to get driver for intel graphic media accelerator for
dell 1012 inspiron mini (os ubuntu 9.04)....?
plz..help,,,,
Post a Comment